Maintenance and Troubleshooting
Preventive Maintenance Schedule
Daily Maintenance Tasks
System Inspection (5 minutes)
- Visual inspection for loose components
- Check stage movement smoothness
- Verify illumination system operation
- Ensure workspace is clean and organized
Basic Cleaning
- Clean sample holders and stage surface
- Remove dust from external surfaces
- Check for cable damage or wear
- Verify all connections are secure
Weekly Maintenance Tasks
Optical System Maintenance (15 minutes)
Objective Lens Cleaning:
⚠️ CAUTION: Use only appropriate cleaning materials to avoid damage.- Power off system before cleaning
- Use lens cleaning paper and solution
- Clean with gentle circular motions from center outward
- Allow to air dry completely
- Inspect for scratches or damage
Condenser Cleaning:
- Remove condenser assembly if necessary
- Clean all optical surfaces
- Check aperture diaphragm operation
- Verify centering adjustments
Mirror and Prism Cleaning:
- Use appropriate cleaning solutions
- Avoid touching first-surface mirrors
- Check alignment after cleaning
- Document any adjustments made
Inner Cube System Maintenance:
⚠️ CAUTION: Power off system completely before cube manipulation.- Remove each cube individually for inspection
- Clean cube interfaces and optical surfaces
- Check drawer rail alignment and smooth operation
- Verify cube locking mechanisms function properly
- Test cube installation/removal procedures
- Document cube positions and configurations
Mechanical System Maintenance (20 minutes)
Stage System:
- Clean stage rails and guides
- Check for wear or damage
- Lubricate moving parts (if specified)
- Verify position accuracy with test sample
Focus Mechanism:
- Check focus tension adjustment
- Verify smooth operation throughout range
- Clean focus scales and indicators
- Test emergency stop functionality
Frame and Mounting:
- Check all mounting screws for tightness
- Verify system level and stability
- Inspect vibration isolation
- Clean and organize cable management
Monthly Maintenance Tasks
Electronic System Maintenance (30 minutes)
Control Electronics:
- Check cooling fans for dust buildup
- Verify all LED indicators are functioning
- Test communication interfaces
- Update firmware if available
Motor Systems (Motorized versions):
- Check motor coupling alignment
- Verify encoder operation
- Test limit switches
- Check cable routing and protection
Power Systems:
- Verify voltage levels at test points
- Check fuse condition and ratings
- Inspect power cables for damage
- Test ground connections
Software Maintenance (15 minutes)
Software Updates:
- Check for ImSwitch updates
- Update device drivers
- Backup configuration files
- Test all software functions
Data Management:
- Archive old image files
- Clean temporary files
- Backup calibration data
- Update user documentation
Motor Controller Firmware Updates
⚠️ CAUTION: Firmware updates should only be performed when necessary.
The motor controllers may occasionally require firmware updates. Each axis controller can be updated individually:
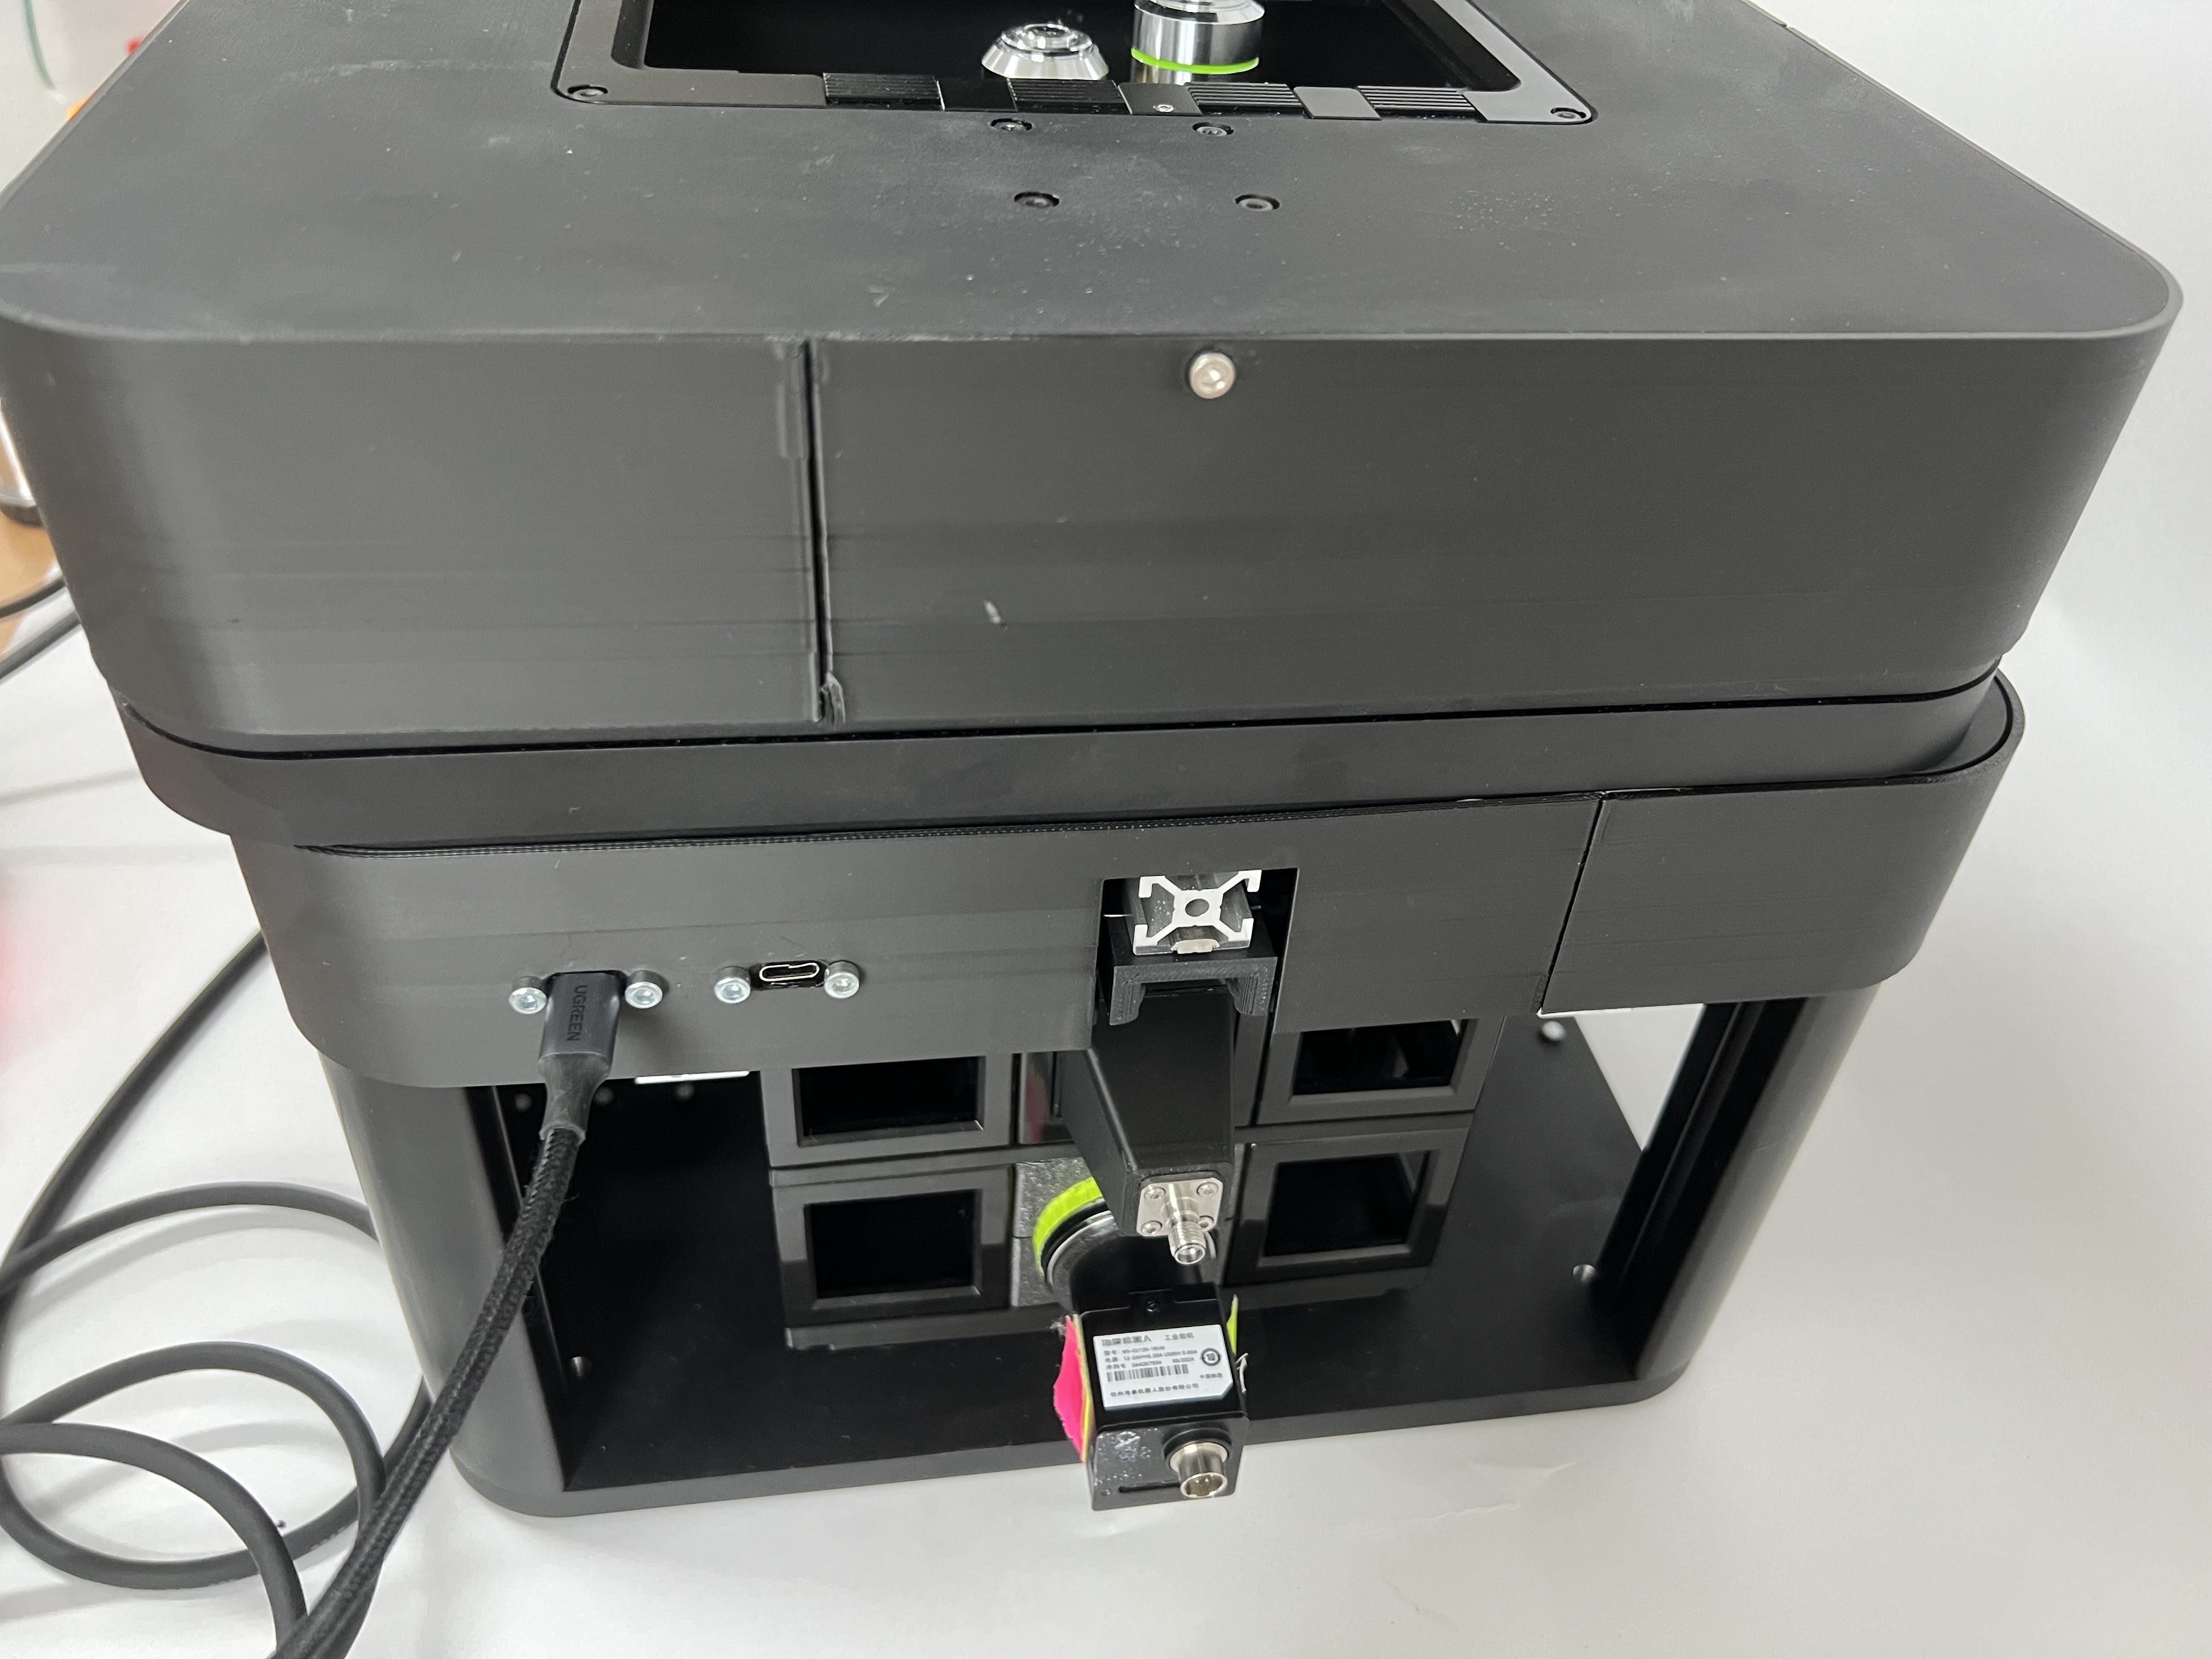 The firmware of the motor controllers may change (hopefully not at all), but if needed, individual motor firmware can be updated. The axes are labeled on the outer box (X,Y,Z,A). Connect a USB-C cable to the appropriate controller.
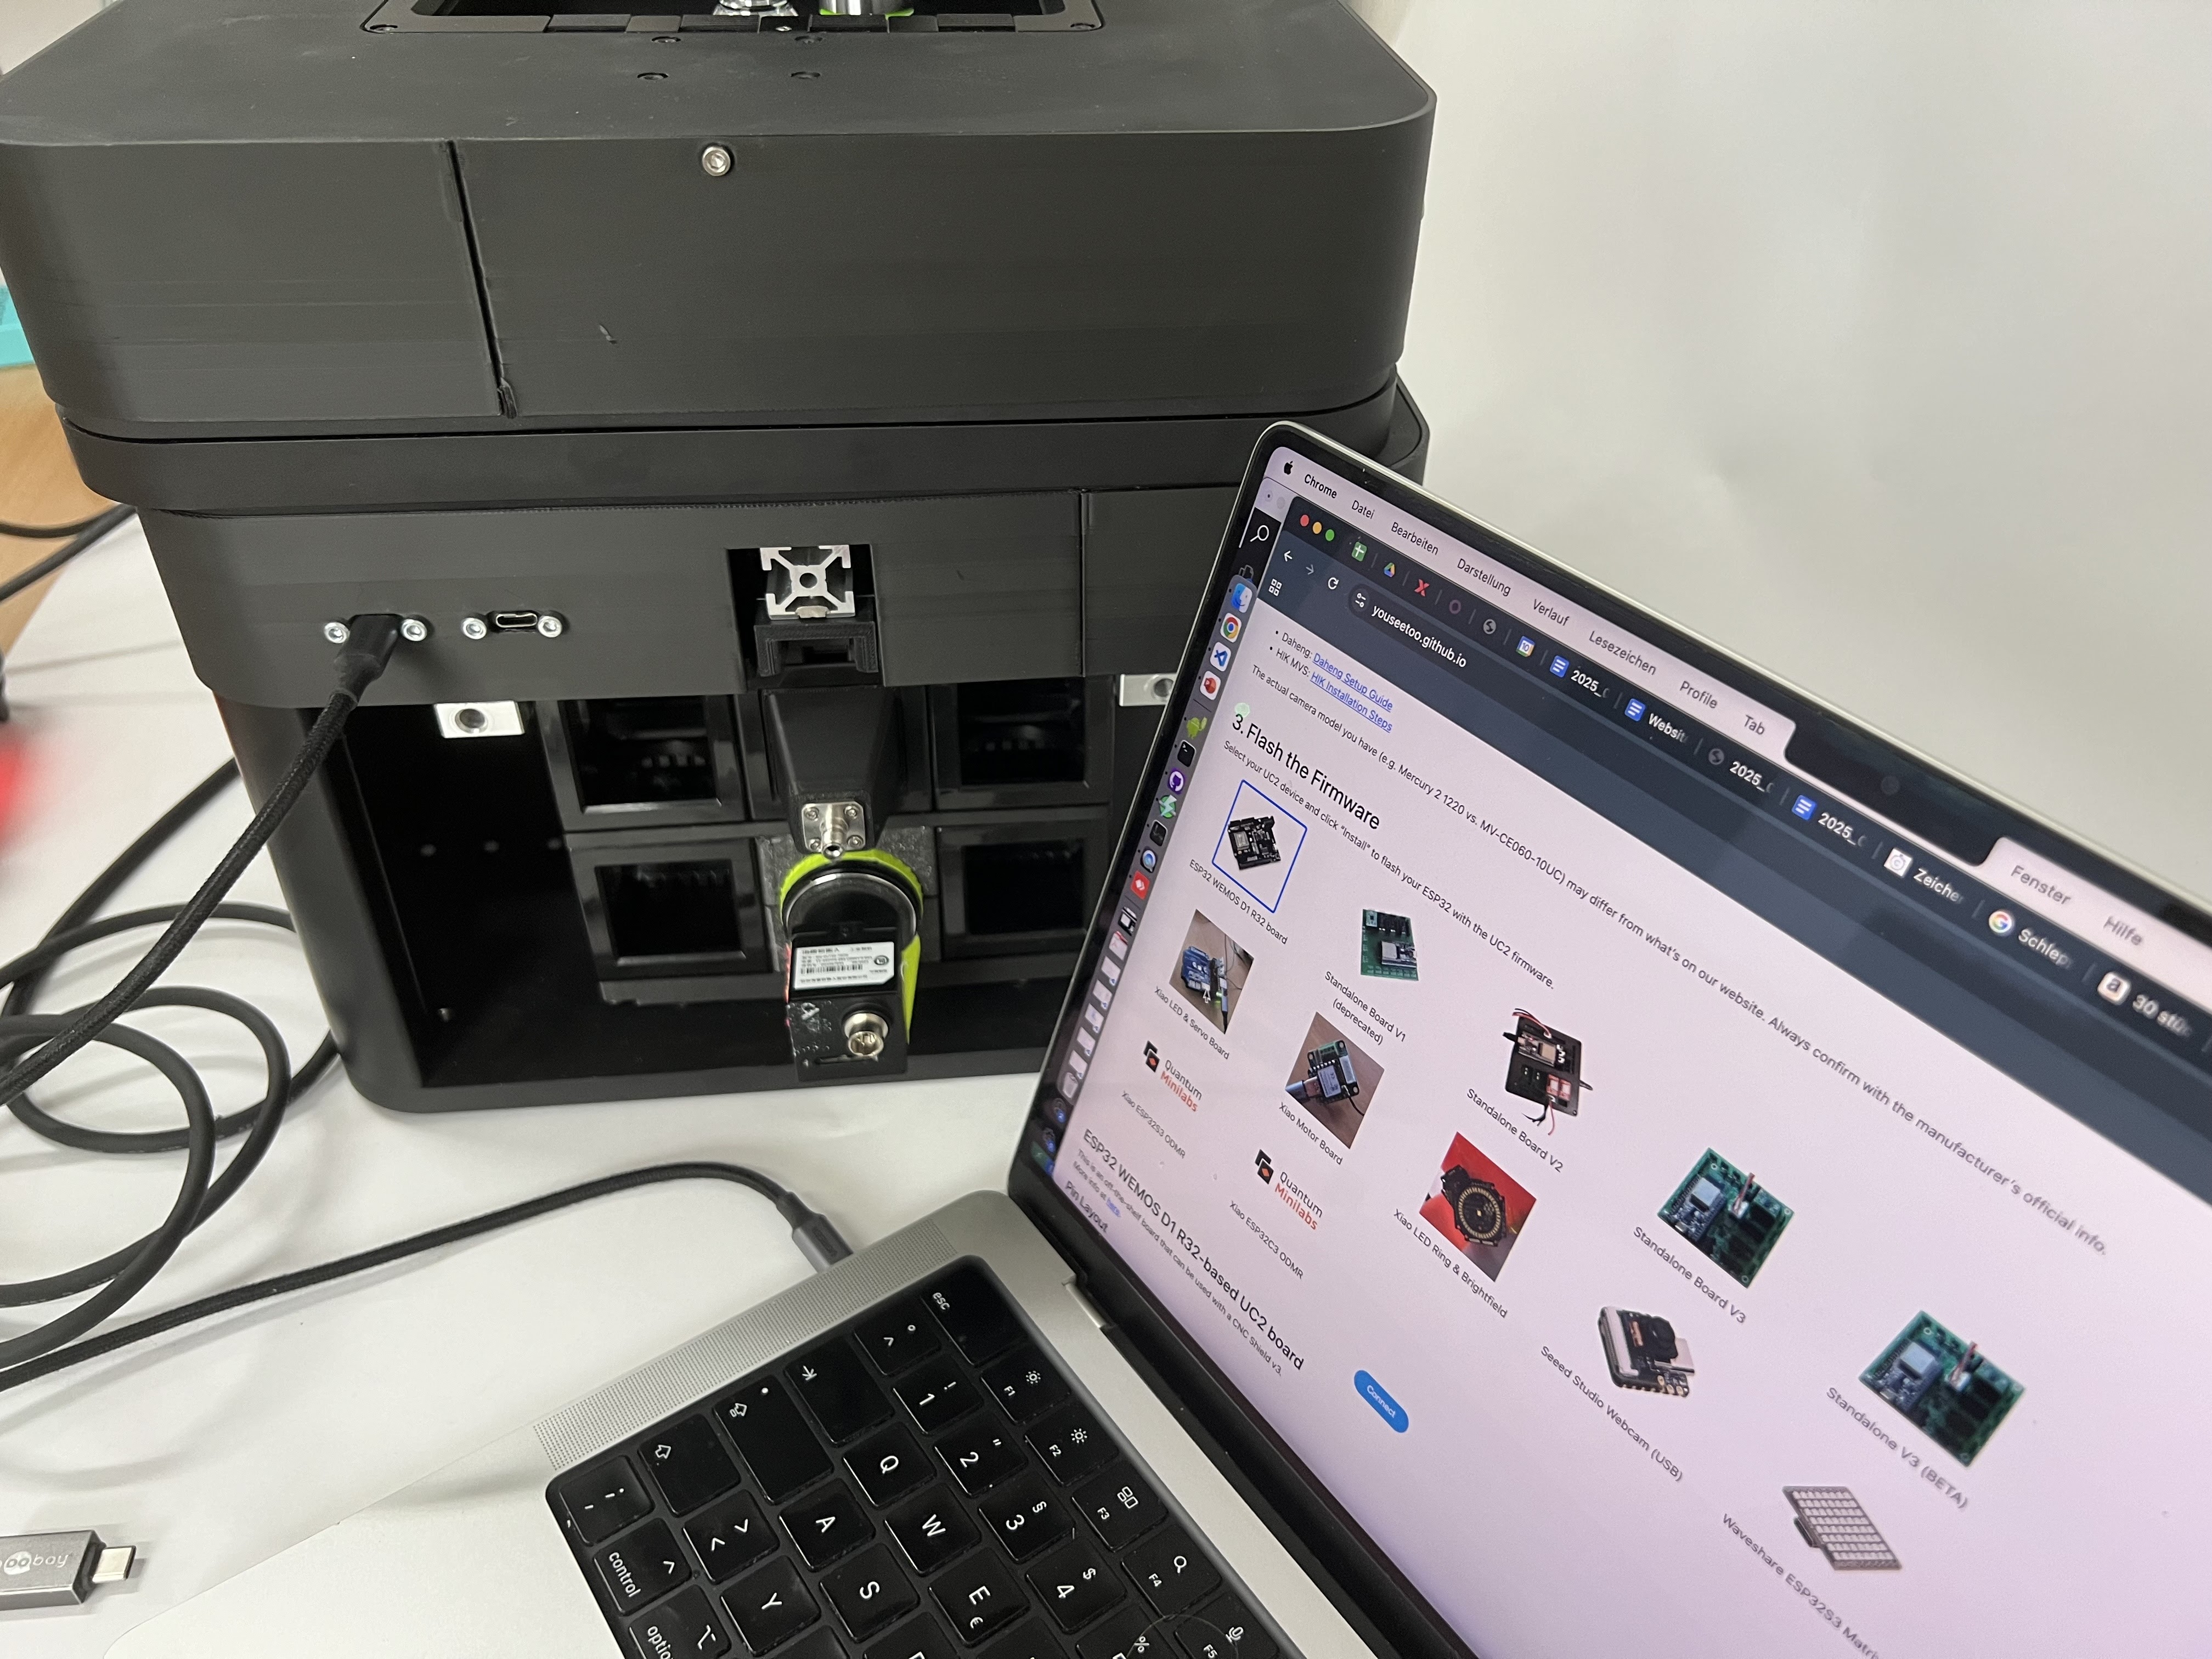 Open the page youseetoo.github.io and select the motor driver as the firmware source. If initial flashing doesn't work, erase the firmware first using https://espressif.github.io/esptool-js/ then retry the update process.
Update Procedure:
- Identify the axis requiring update (X, Y, Z, A labels on controllers)
- Connect USB-C cable to specific motor controller
- Access firmware update website: youseetoo.github.io
- Select appropriate motor driver firmware
- If update fails, erase existing firmware using ESP tool
- Retry firmware installation
- Test motor functionality after update
- Document firmware version and date
Quarterly Maintenance Tasks
Comprehensive System Check (60 minutes)
Precision Testing:
- Stage positioning accuracy test
- Focus repeatability test
- Image quality assessment
- Illumination uniformity check
Environmental Monitoring:
- Temperature sensor calibration
- Humidity sensor verification
- Vibration analysis
- EMI testing (if applicable)
Safety System Verification:
- Emergency stop testing
- Interlock system verification
- UV safety system check
- Electrical safety inspection
Cleaning Procedures
Optical Component Cleaning
Materials Required
- Lens cleaning paper (lint-free)
- Optical cleaning solution (isopropanol-based)
- Cotton swabs (optical grade)
- Compressed air (oil-free)
- Anti-static cleaning cloth
Cleaning Solutions
Approved Cleaning Solutions:
- Isopropanol (99% pure)
- Commercial lens cleaning solutions
- Distilled water (for water-soluble residues)
Prohibited Materials:
- Paper towels or tissues
- Acetone or aggressive solvents
- Abrasive cleaners
- Household cleaning products
Step-by-Step Cleaning Process
Preparation:
⚠️ WARNING: Power off system and allow cooling before cleaning.- Turn off all power
- Allow system to reach room temperature
- Gather appropriate cleaning materials
- Work in clean, dust-free environment
Dust Removal:
- Use compressed air to remove loose particles
- Work from center to edges
- Use low pressure to avoid damage
- Never touch optical surfaces directly
Cleaning Solution Application:
- Apply small amount of solution to cleaning paper
- Use gentle circular motions from center outward
- Work in overlapping spirals
- Avoid excessive pressure
Drying and Inspection:
- Allow natural air drying
- Inspect under good lighting
- Repeat if necessary
- Document any damage found
Optics Cube Removal and Deep Cleaning
⚠️ CAUTION: Follow proper procedure to avoid damaging optical components.
When deeper cleaning or optical alignment is required, the inner optics cube can be removed:
- Preparation:
- Power down the system completely
- Allow system to cool to room temperature
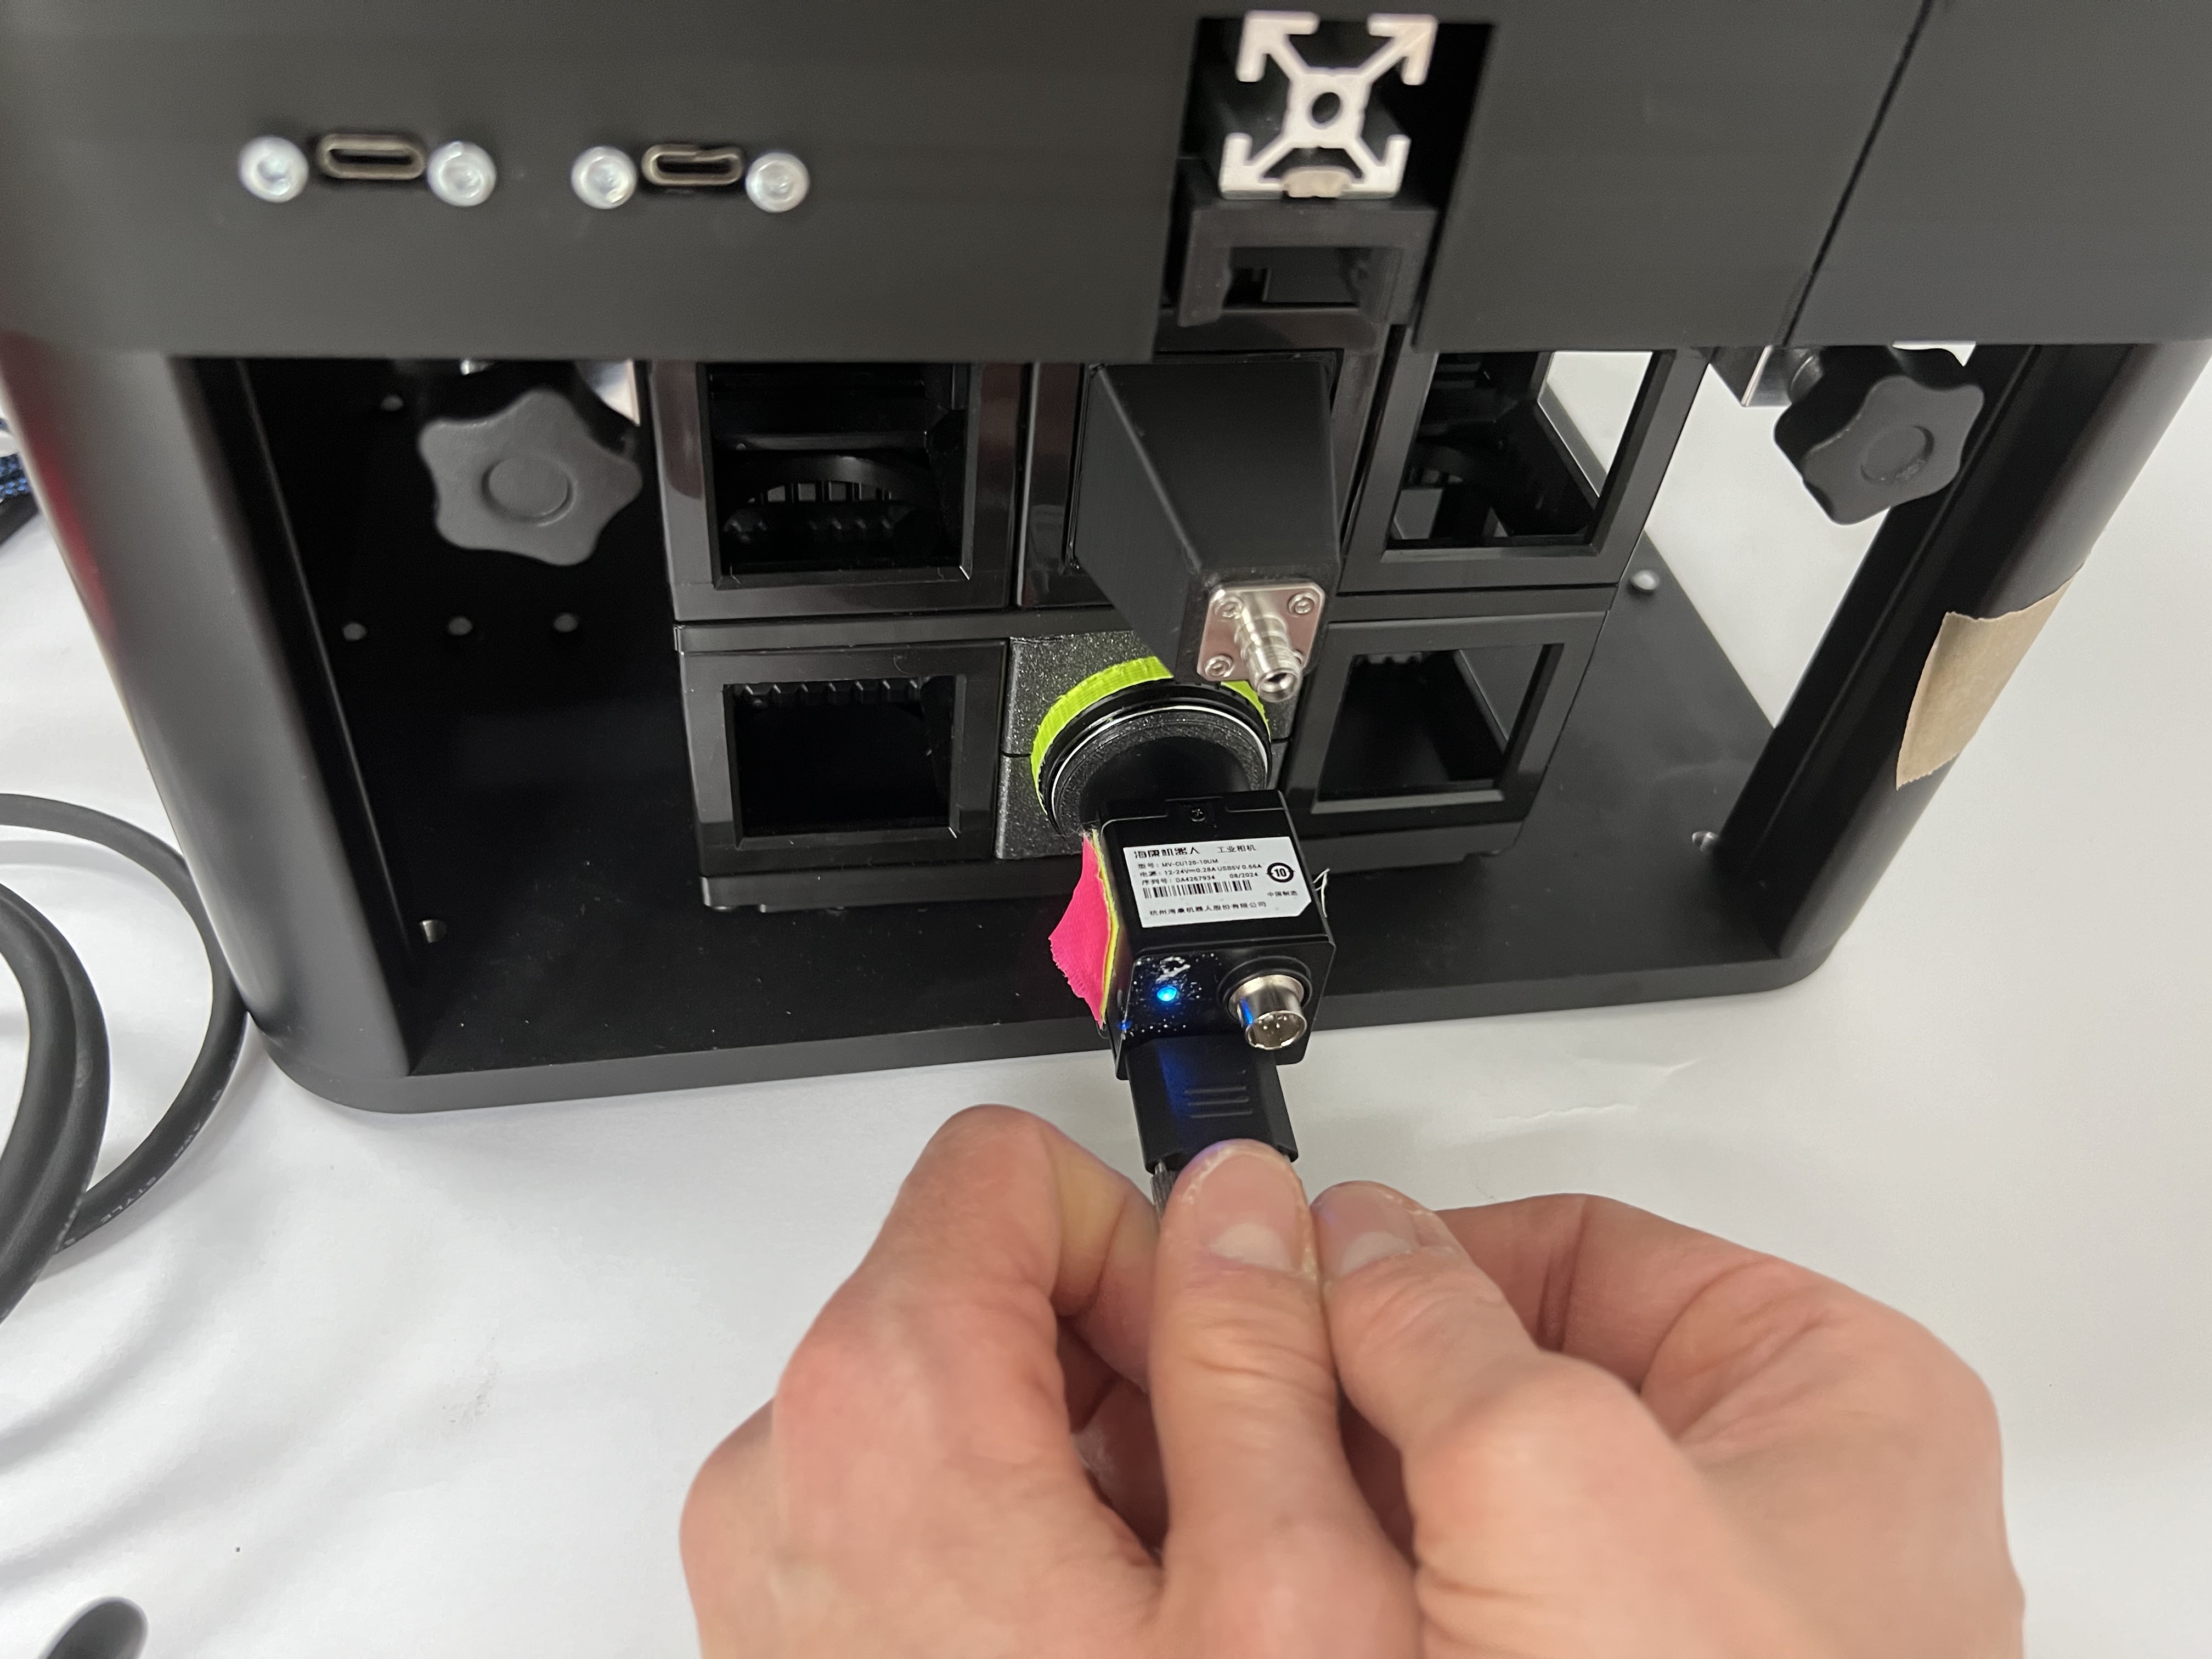 Disconnect the USB3 cable from the camera before removing the optics cube.
- Removal Process:
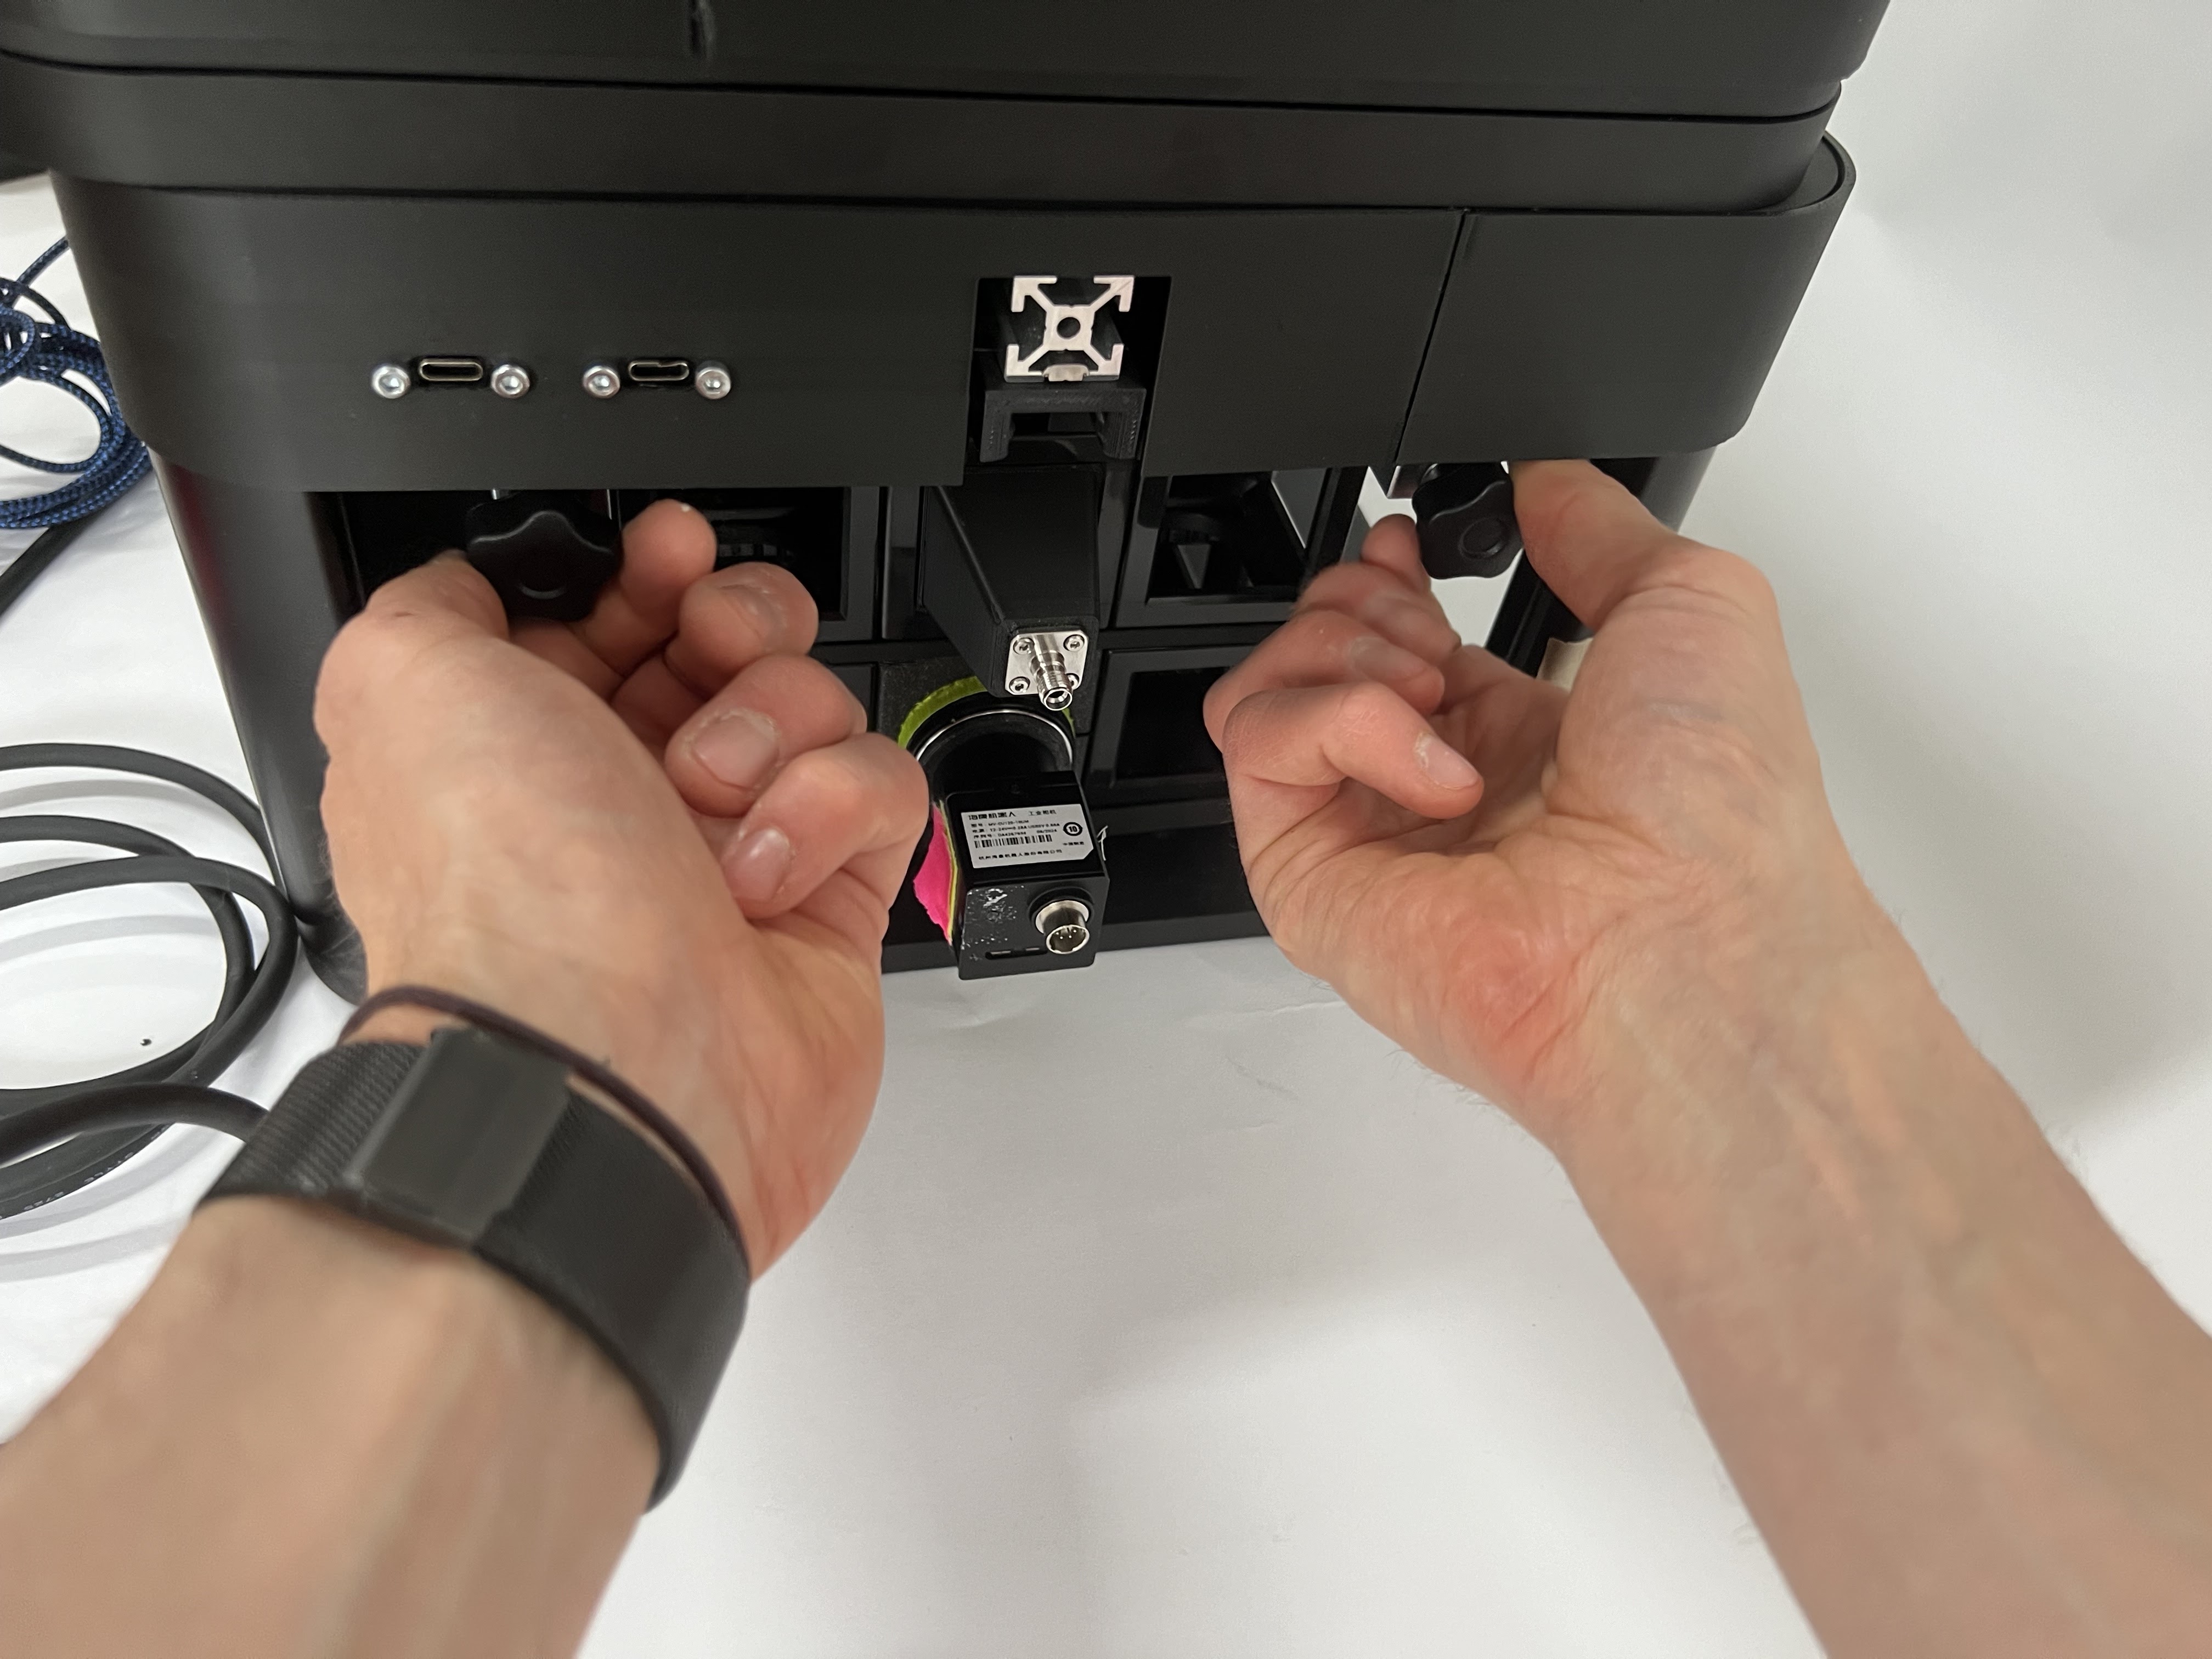 Unscrew the securing capped screws that fix the optics cube in the FRAME.
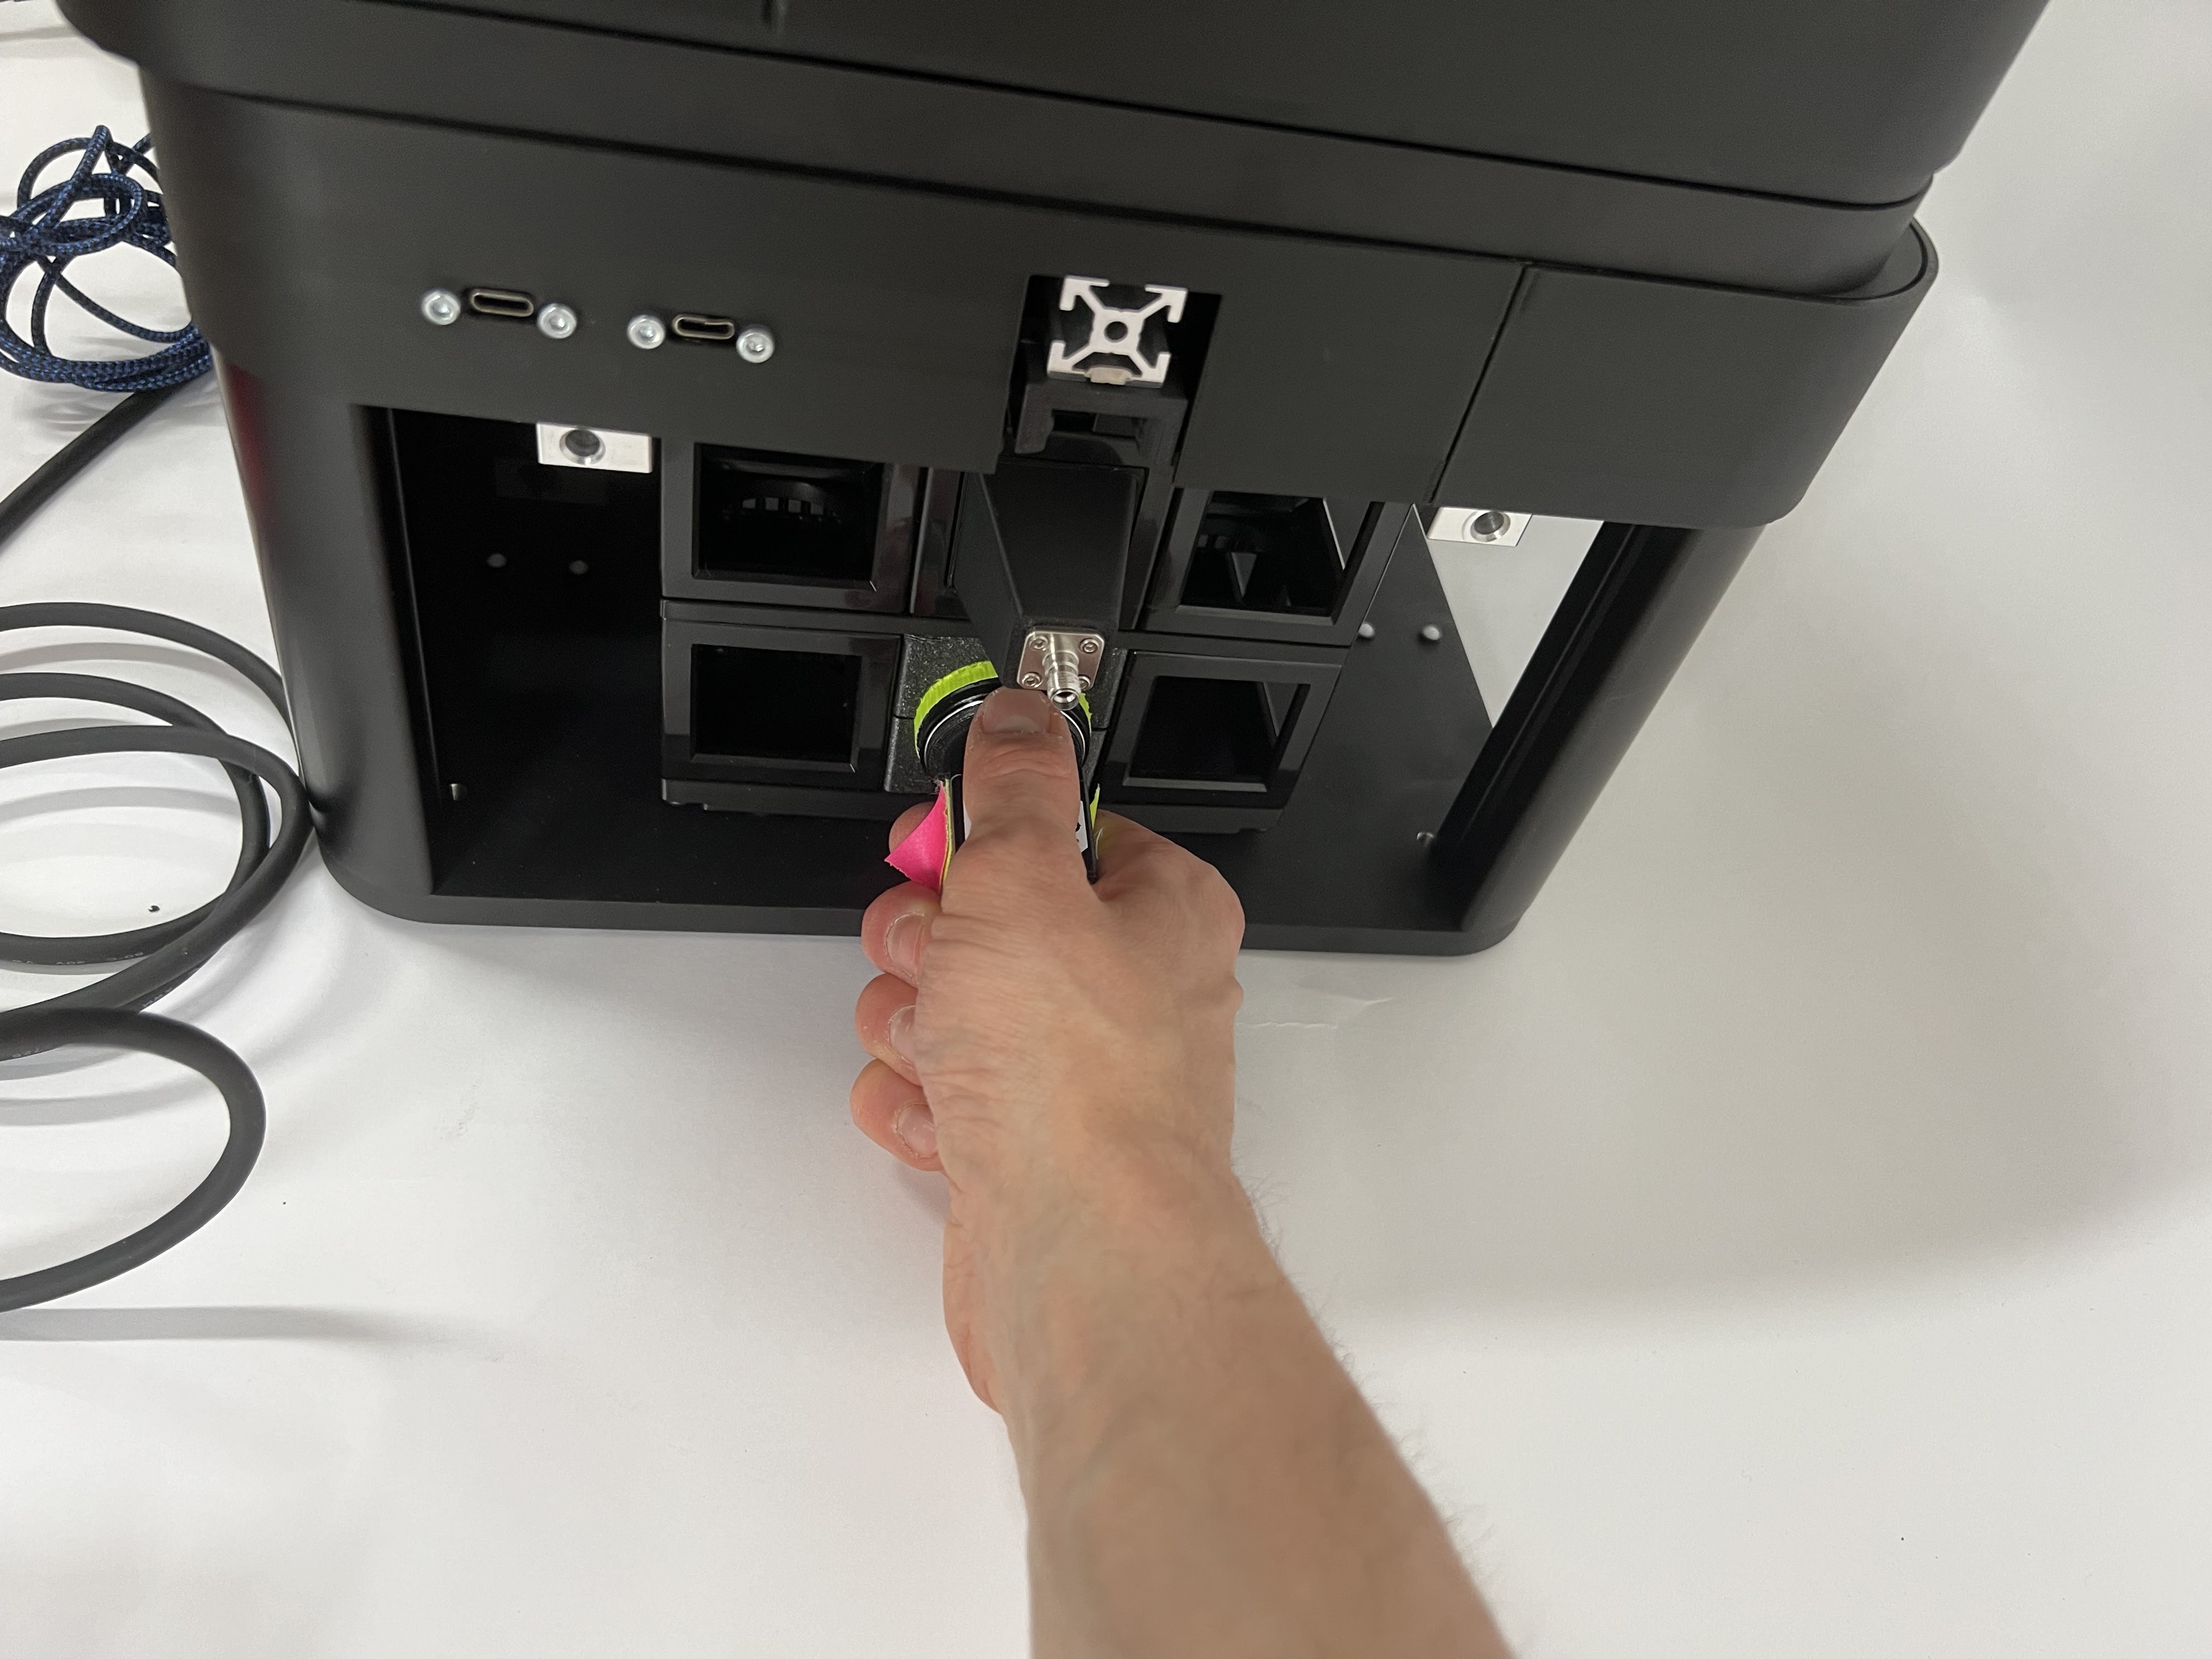 Pull out the entire optics assembly. There is a linear rail that helps you move it in/out precisely.
- Safe Storage and Cleaning:
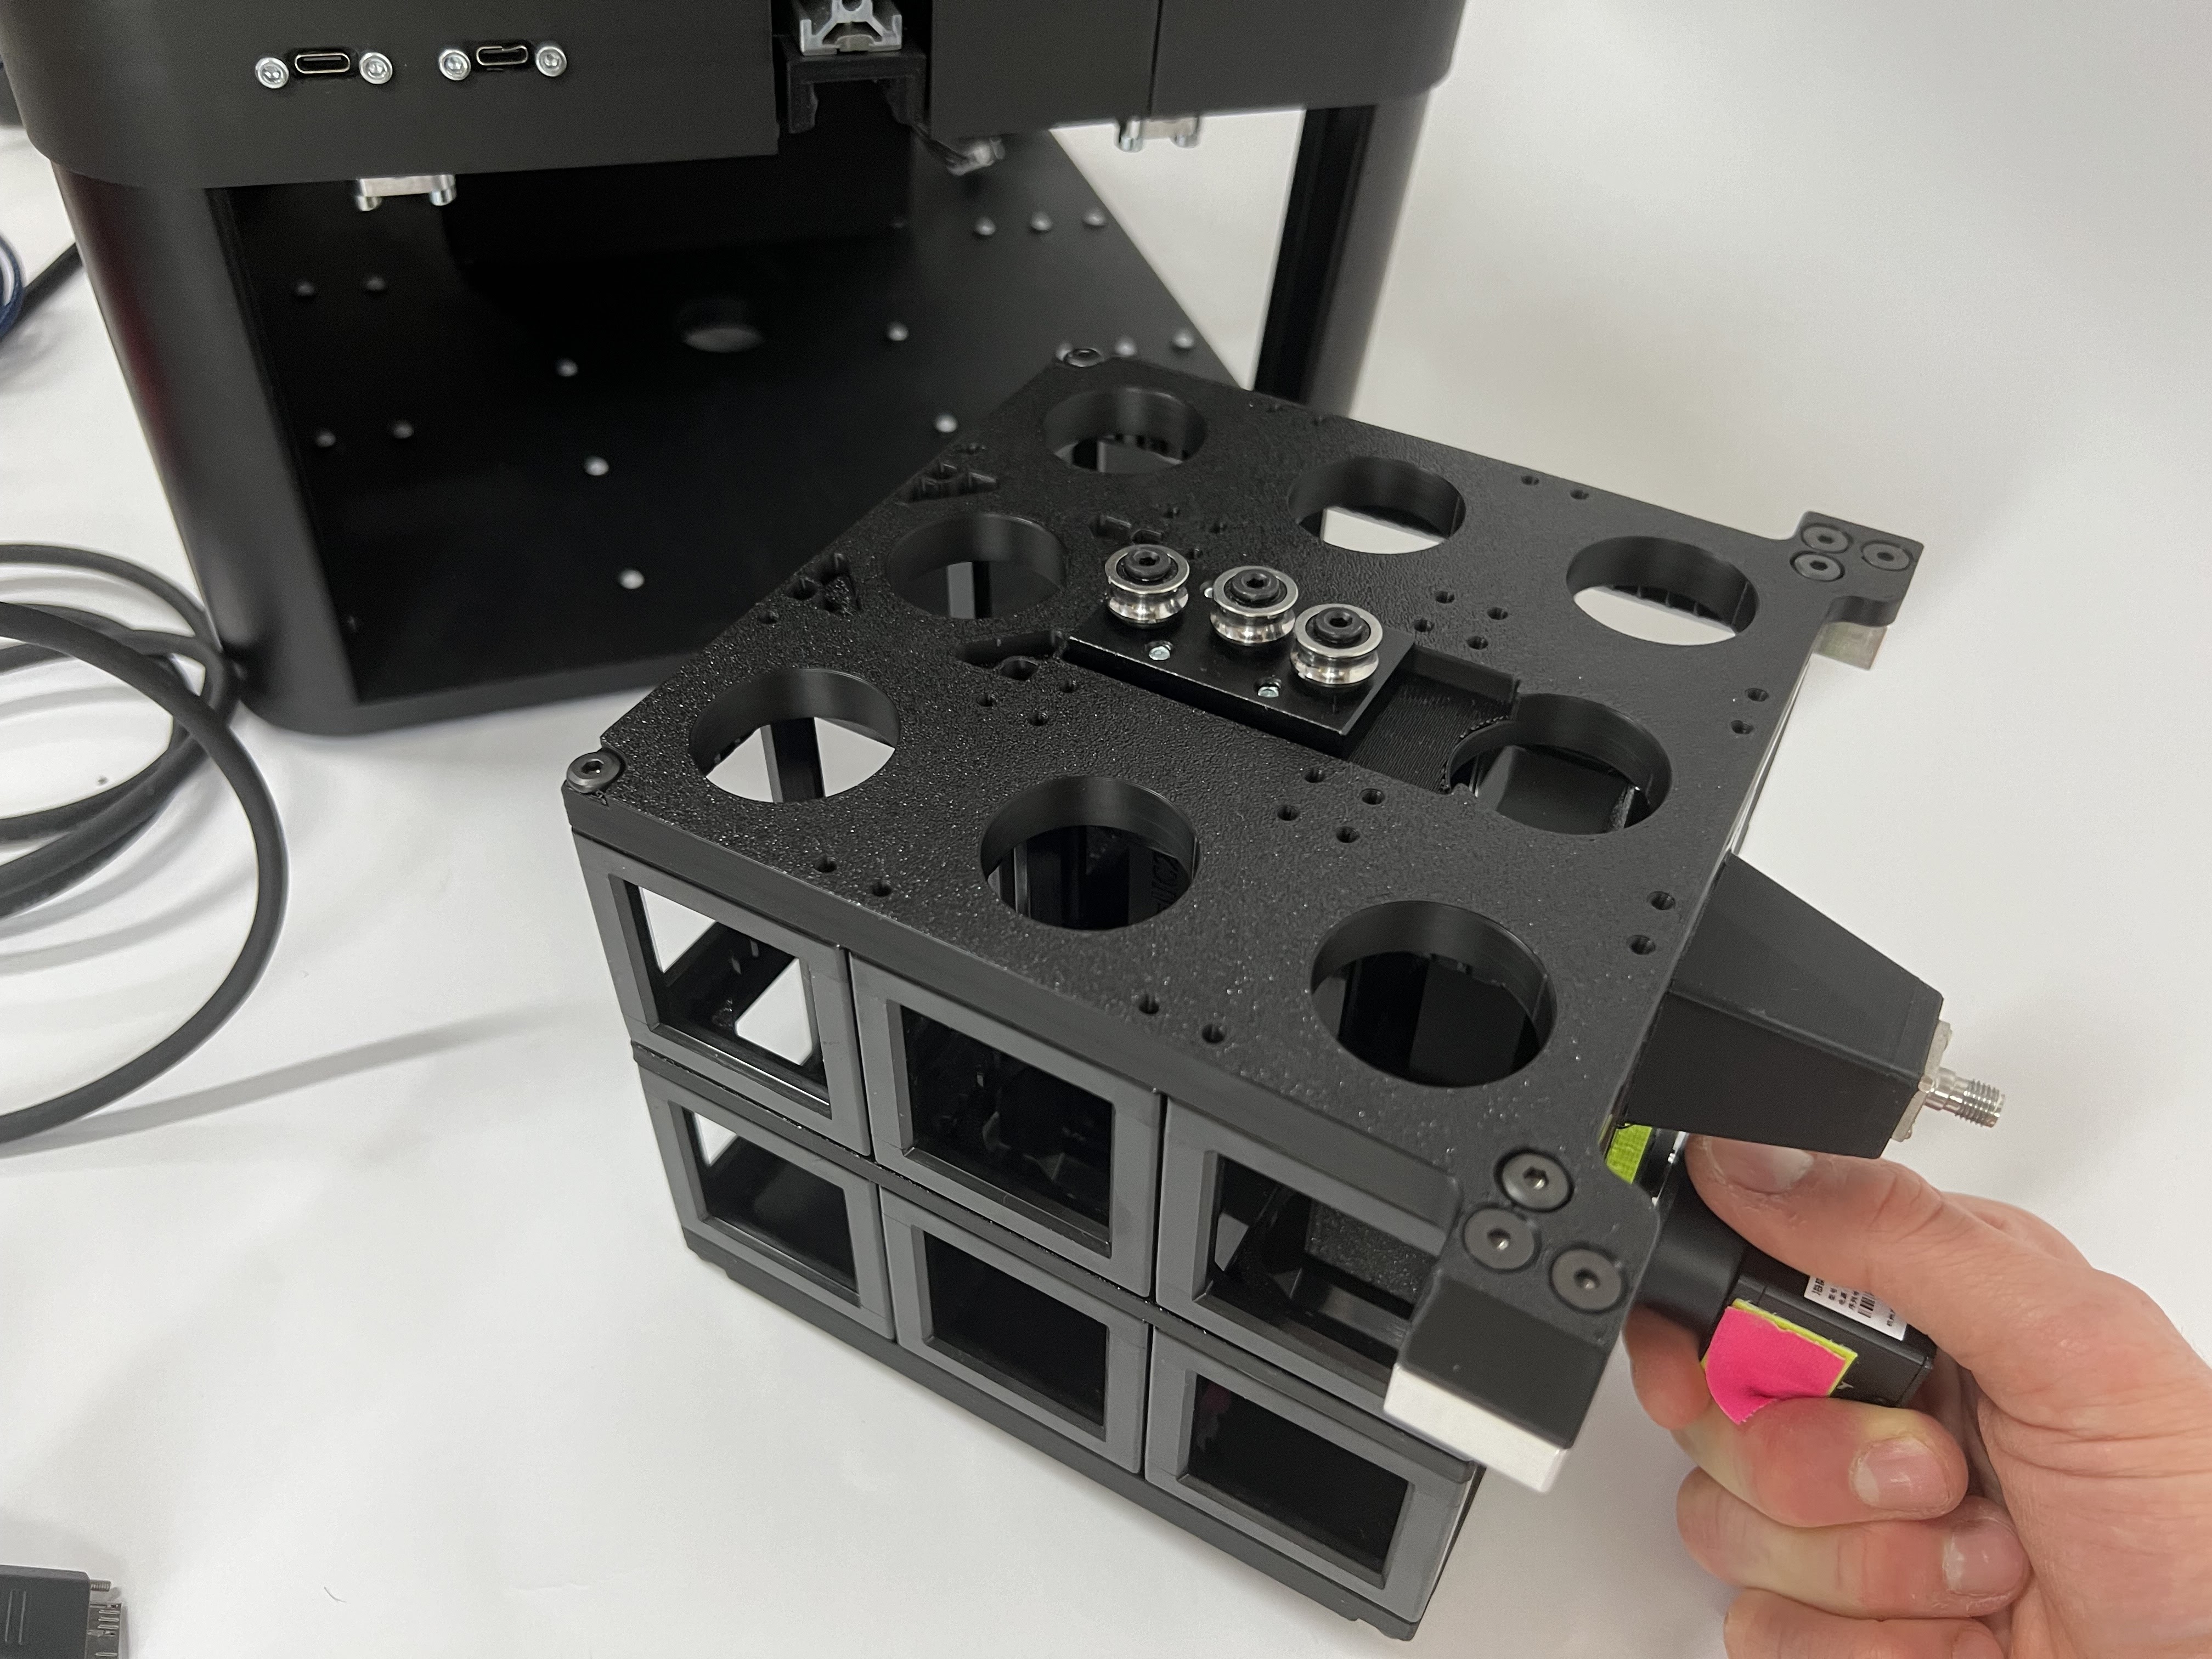 Make sure you store the cube safely somewhere. In this configuration you can clean the optics with compressed air and perform detailed optical maintenance.
- Reinstallation:
- Reverse the removal procedure
- Ensure proper alignment with linear rail
- Reconnect all cables securely
- Test system functionality after reassembly
Mechanical Component Maintenance
Stage System Cleaning
Stage Rails:
- Remove accumulated debris
- Clean with appropriate solvent
- Check for wear or scoring
- Apply specified lubricant if needed
Sample Holders:
- Remove biological residues
- Clean with mild detergent
- Rinse with distilled water
- Dry completely before use
Focus Mechanism Maintenance
Focus Scales:
- Clean graduations with soft brush
- Remove any built-up debris
- Check scale accuracy
- Verify pointer alignment
Adjustment Knobs:
- Clean grip surfaces
- Check for smooth operation
- Verify tension adjustments
- Test throughout full range
Calibration Procedures
Stage Calibration
Position Accuracy Calibration
Equipment Required:
- Calibrated stage micrometer
- High-resolution camera
- Stable lighting
- Calibration software
Procedure:
📝 NOTE: Perform calibration at operating temperature.- Install stage micrometer
- Home all axes
- Measure known distances
- Calculate scaling factors
- Update software parameters
Acceptance Criteria:
- X-axis accuracy: ±2 μm over 50 mm
- Y-axis accuracy: ±2 μm over 75 mm
- Repeatability: ±0.5 μm
Angular Calibration
Equipment Required:
- Precision angle standard
- Rotary stage (if applicable)
- Angular measurement software
Procedure:
- Mount angle standard
- Measure known angles
- Check linearity
- Update calibration tables
Focus System Calibration
Manual Focus Calibration
Scale Verification:
- Use precision gauge blocks
- Measure focus travel
- Check scale linearity
- Adjust scale if necessary
Repeatability Test:
- Return to reference position multiple times
- Measure deviation
- Document results
- Adjust if outside specifications
Motorized Focus Calibration
Encoder Calibration:
- Home focus system
- Move to known positions
- Verify encoder counts
- Update position tables
Backlash Compensation:
- Measure backlash in both directions
- Set software compensation
- Verify improvement
- Document settings
Camera System Calibration
Pixel Size Calibration
Equipment Required:
- Calibrated micrometer slide
- Stable illumination
- Image analysis software
Procedure:
- Capture image of micrometer
- Measure pixel distance between graduations
- Calculate pixels per micrometer
- Update software settings
Verification:
- Measure multiple distances
- Check consistency
- Document calibration factor
- Verify at different magnifications
Camera Linearity
Intensity Linearity:
- Use calibrated neutral density filters
- Measure response at different intensities
- Check for linearity
- Document response curve
Geometric Distortion:
- Image grid pattern
- Measure distortion across field
- Generate correction map
- Apply in software
Troubleshooting Guide
Systematic Troubleshooting Approach
Problem Identification
Symptom Documentation:
- Describe problem precisely
- Note when problem occurs
- Document error messages
- Record environmental conditions
Problem Categorization:
- Mechanical issues
- Optical problems
- Electronic failures
- Software errors
Diagnostic Tools
Hardware Diagnostics:
- Built-in system diagnostics
- External test equipment
- Calibration standards
- Measurement devices
Software Diagnostics:
- System log files
- Error reporting tools
- Performance monitors
- Network diagnostics
Common Problems and Solutions
Mechanical Issues
Problem: Stage Movement Issues
Symptoms: Jerky movement, positioning errors, binding
Diagnostic Steps:
- Check for debris on rails
- Verify motor connections
- Test limit switches
- Check encoder operation
Solutions:
- Clean stage rails and guides
- Adjust motor driver current
- Replace damaged cables
- Realign mechanical components
Problem: Focus Drift
Symptoms: Image slowly goes out of focus
Diagnostic Steps:
- Monitor temperature stability
- Check mechanical connections
- Verify objective mounting
- Test focus repeatability
Solutions:
- Allow longer warm-up time
- Tighten mounting screws
- Improve environmental control
- Replace worn components
Optical Issues
Problem: Poor Image Quality
Symptoms: Blurry images, low contrast, artifacts
Diagnostic Steps:
- Check objective cleanliness
- Verify illumination alignment
- Test with known good sample
- Check camera focus
Solutions:
- Clean optical components
- Realign illumination system
- Adjust condenser settings
- Recalibrate camera focus
Problem: Uneven Illumination
Symptoms: Bright or dark areas in image
Diagnostic Steps:
- Check LED alignment
- Verify condenser position
- Test with different samples
- Measure illumination profile
Solutions:
- Realign LED system
- Adjust condenser height
- Clean condenser lens
- Replace faulty LEDs
Electronic Problems
Problem: Communication Errors
Symptoms: Device not responding, timeout errors
Diagnostic Steps:
- Check cable connections
- Verify device addresses
- Test communication protocol
- Check network settings
Solutions:
- Reseat cables
- Reconfigure device addresses
- Update drivers
- Reset network settings
Problem: Motor Control Issues
Symptoms: Motors not moving, erratic movement
Diagnostic Steps:
- Check motor power supply
- Verify driver settings
- Test motor cables
- Check control signals
Solutions:
- Replace power supply
- Adjust driver parameters
- Replace damaged cables
- Reset motor controllers
Software Problems
Problem: Software Crashes
Symptoms: Application stops responding, error dialogs
Diagnostic Steps:
- Check system resources
- Review error logs
- Test with minimal configuration
- Verify software version
Solutions:
- Close other applications
- Update software
- Increase virtual memory
- Reinstall problematic modules
Problem: Image Acquisition Failures
Symptoms: No images captured, corrupted files
Diagnostic Steps:
- Check camera connection
- Verify disk space
- Test camera settings
- Check file permissions
Solutions:
- Reinstall camera drivers
- Free disk space
- Reset camera parameters
- Modify file permissions
Service and Support
When to Contact Service
Immediate Service Required
Contact service immediately for:
- Safety system failures
- Electrical hazards
- Mechanical damage
- Laser safety violations (if applicable)
Scheduled Service Recommended
Contact service for:
- Annual calibration verification
- Major component upgrades
- Performance outside specifications
- Persistent unexplained problems
Service Preparation
Information to Gather
Before contacting service:
- System serial number
- Software version numbers
- Problem description
- Error messages or codes
- Recent changes to system
System Documentation
Prepare for service visit:
- System configuration files
- Calibration records
- Maintenance logs
- User manual and documentation
Warranty Information
Warranty Coverage
Standard warranty includes:
- 1 year parts and labor
- Software updates
- Technical support
- Calibration verification
Warranty Limitations
Warranty void if:
- System modified without authorization
- Operated outside specifications
- Damaged by misuse
- Serviced by unauthorized personnel
Technical Support
Contact Information
Technical Support:
- Email: support@openuc2.com
- Phone: +49 (0) XXXX XXXXXX
- Hours: 9:00 AM - 5:00 PM CET, Monday-Friday
Emergency Support:
- Available 24/7 for safety-related issues
- Contact through main support number
Online Resources
- User manual downloads
- Software updates
- FAQ database
- Video tutorials
- Community forums
Spare Parts and Consumables
Common Spare Parts
| Part | Part Number | Recommended Quantity |
|---|---|---|
| Fuses (5A, slow blow) | F001-5A | 5 pieces |
| LED modules | LED-001 | 2 pieces |
| Cable assemblies | CAB-001 | 1 set |
| Optical cleaning kit | CLEAN-001 | 1 kit |
Consumables
| Item | Part Number | Replacement Interval |
|---|---|---|
| Lens cleaning paper | PAPER-001 | As needed |
| Cleaning solution | CLEAN-002 | 6 months |
| Compressed air | AIR-001 | As needed |
| Fuses | Various | As needed |
Ordering Information
- Parts available through openUC2 or authorized distributors
- Minimum order quantities may apply
- Express shipping available for critical parts
- Bulk discounts available for educational institutions
Continue to Appendix for additional reference information.