ImSwitch in Docker II Tutorial
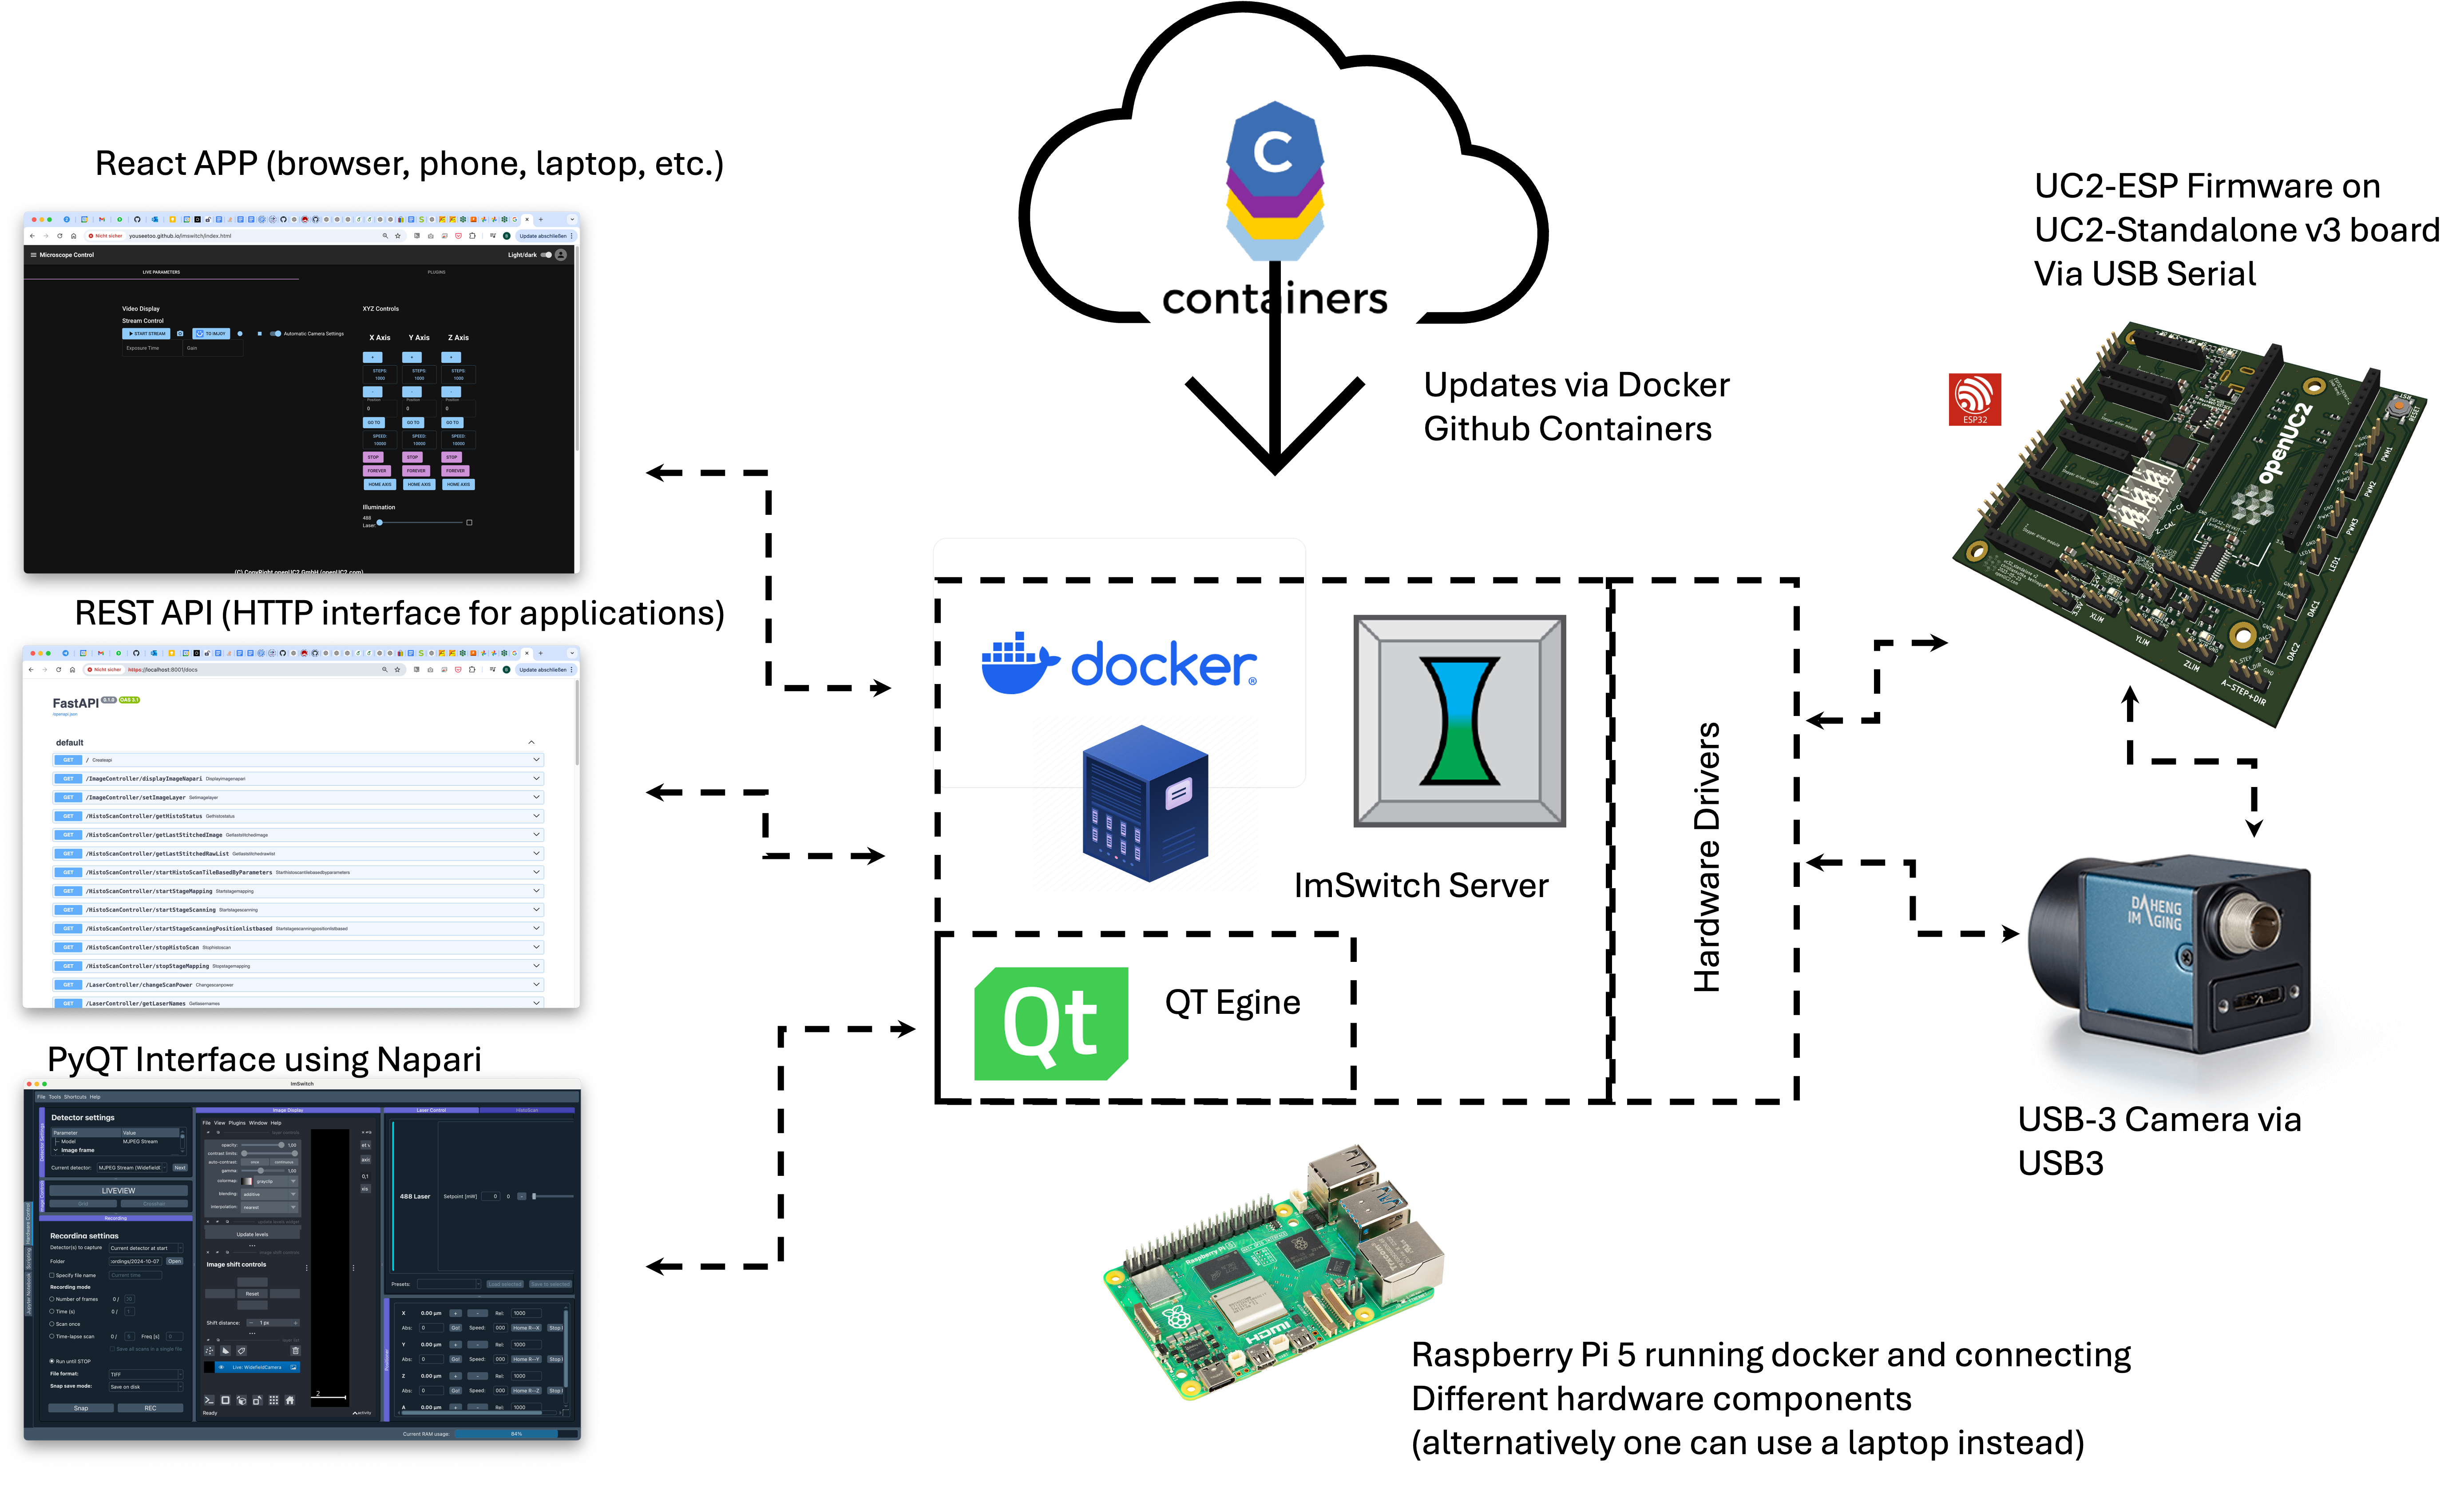
This tutorial outlines how to set up and run ImSwitch using Docker, where ImSwitch is deployed as a Python application inside a container. The container uses an Ubuntu image with all required libraries and dependencies, including UC2-REST for ESP32 control, and provides access to ImSwitch via a FastAPI-based REST API server.
Setup Overview
ImSwitch is a modular Python application installed inside a Docker container. The process includes:
- Creating an isolated environment with all necessary libraries.
- Pulling and installing ImSwitch from the latest GitHub master branch.
- Installing the UC2-REST library to control external devices like ESP32.
- Setting up FastAPI to expose a REST API interface for remote control.
- Running a React app on top of the REST API for web-based control.

- Central component: Python-based microscopy software ImSwitch.
- Function: Connects hardware elements and their device drivers as well as controllers.
- Application: Realization of time-lapse recordings and complex scanning patterns.
- Abstraction: Software acts as an independent server.
- Generic interface: Can be used by different programming languages and browsers.
- Docker integration: ImSwitch is packaged as a Docker container and can be compiled cloud-based.
- Easy updates: Script downloads changes and integrates them automatically.
- Hardware workflow: Hardware is integrated into the workflow via configuration files.
- USB integration: Devices can interact with the Docker container via USB.
- Docker on different systems: Docker container runs on Raspberry Pi or other computers, for example.
- Web-based interface: Access to Rest API via a website.
- Alternative installation: ImSwitch can also be installed outside a Docker container, with QT elements.
- Image processing: Integration of the image viewer Napari, which supports numerous open source image processing tools.
UC2-ESP32 Firmware
This is the firmware running on the ESP32 mostly pushed by "KillerInk". It's very modular by being able to compile only those hardware modules that are actually used (e.g. Motors, LEDs, Input controllers, Wifi,...). Each module has a loop, get, act and setup method that are registered and executed during runtime, explicit call (e.g. via serial, via I2c..) and during boot. In order to save RAM and CPU resources the next version outsources e.g. the motors from the main loop by sending/relaying the commands e.g. from the PS4 controller to auxialry hardware that's connceted via I2C
The firmware can be found here: https://github.com/youseetoo/uc2-esp32/tree/reworkBD
One-Step Installation (Raspi + Debian?)
For Debian-based systems (Raspberry Pi and others), there is a one-step installation script that installs Docker, camera drivers, and pulls the Docker container for ImSwitch:
Repository: openUC2/ImSwitchDockerInstall
Script: install_all.sh installs everything you need.
Two-step installation (most other cases)
Pull the docker-container and run it
docker pull ghcr.io/openuc2/imswitch-noqt-x64:latest
sudo docker run -it --rm -p 8001:8001 -p 2222:22 -e HEADLESS=1 -e HTTP_PORT=8001 -e CONFIG_FILE=example_uc2_hik_flowstop.json -e UPDATE_GIT=0 -e UPDATE_CONFIG=0 --privileged ghcr.io/openuc2/imswitch-noqt-x64:latest
More information about this here: https://openuc2.github.io/docs/ImSwitch/ImSwitchDocker#docker-quick-start
Building the Docker Image
ImSwitch and UC2-REST are cloned and installed into the Docker image directly from the latest commits. During each build, the Git archives are fetched again, ensuring the installation is up-to-date without starting from scratch.
The Dockerfile for ImSwitch can be found here: Dockerfile
Running ImSwitch via Docker
After the Docker image is built, you can run the container with ImSwitch by specifying the necessary parameters. Here’s an example startup script:
params=()
if [[ $HEADLESS == "1" || $HEADLESS == "True" || $HEADLESS == "true" ]]; then
    params+=" --headless"
fi;
if [[ $ssl == "0" || $ssl == "False" || $ssl == "false" ]]; then
    params+=" --no-ssl"
fi;
params+=" --http-port ${HTTP_PORT:-8001}"
params+=" --config-folder ${CONFIG_PATH:-None}"
params+=" --config-file ${CONFIG_FILE:-None}"
params+=" --ext-data-folder ${DATA_PATH:-None}"

echo 'Starting ImSwitch with the following parameters:'
echo "${params[@]}"
python3 /tmp/ImSwitch/main.py $params
Key Entry Points
Main Execution: ImSwitch is launched from the main Python script, where configuration files and parameters are passed to set up the environment.
API Decorators: Functions decorated with
@APIExportare automatically exposed as API endpoints in the FastAPI server.- API definition: ImSwitchServer.py#L171
Accessing the REST API
The REST API server runs on port 8001 by default, with SSL enabled. You can interact with the API through the following interfaces:
Swagger UI: Access the API documentation here:
https://localhost:8001/docsWeb Interface: A React app is served on top of the REST API:
https://localhost:8001/imswitch/index.html
With this setup, you now have a running ImSwitch instance inside Docker, accessible via both API and web-based interfaces for control and configuration.