ImSwitch in Docker
Setting Up ImSwitch React and Backend (optional: with Docker Compose)
More information on setting upt this on a raspberry pi, please refer to the INSTALL ON PI documentation.
Warning This is very experimental. What you can expect:
- This installs an NO-QT (no PyQt/Qt dependency) headless version on your computer
- The APP is exposed under Port 8001 on your localhost
- You can access the Swagger GUI under https://localhost:8001/docs
- You can access the REACT APP (source: https://github.com/openUC2/imswitch-aiortc-react/) under https://localhost:8001/imswitch/index.html
- You can customize the setup config/boot behaviour using additional arguments
- The
dockerfilecan mount HIK cameras (tested on ARM devices) - The
dockerfileis available here: https://github.com/openUC2/ImSwitch/blob/master/docker/HIK/dockerfile - The github actions file that builds the NOQT branch into a docker image for ARM/X86 is available here: https://github.com/openUC2/ImSwitch/blob/master/.github/workflows/imswitch-docker-multiarch-noqt.yaml
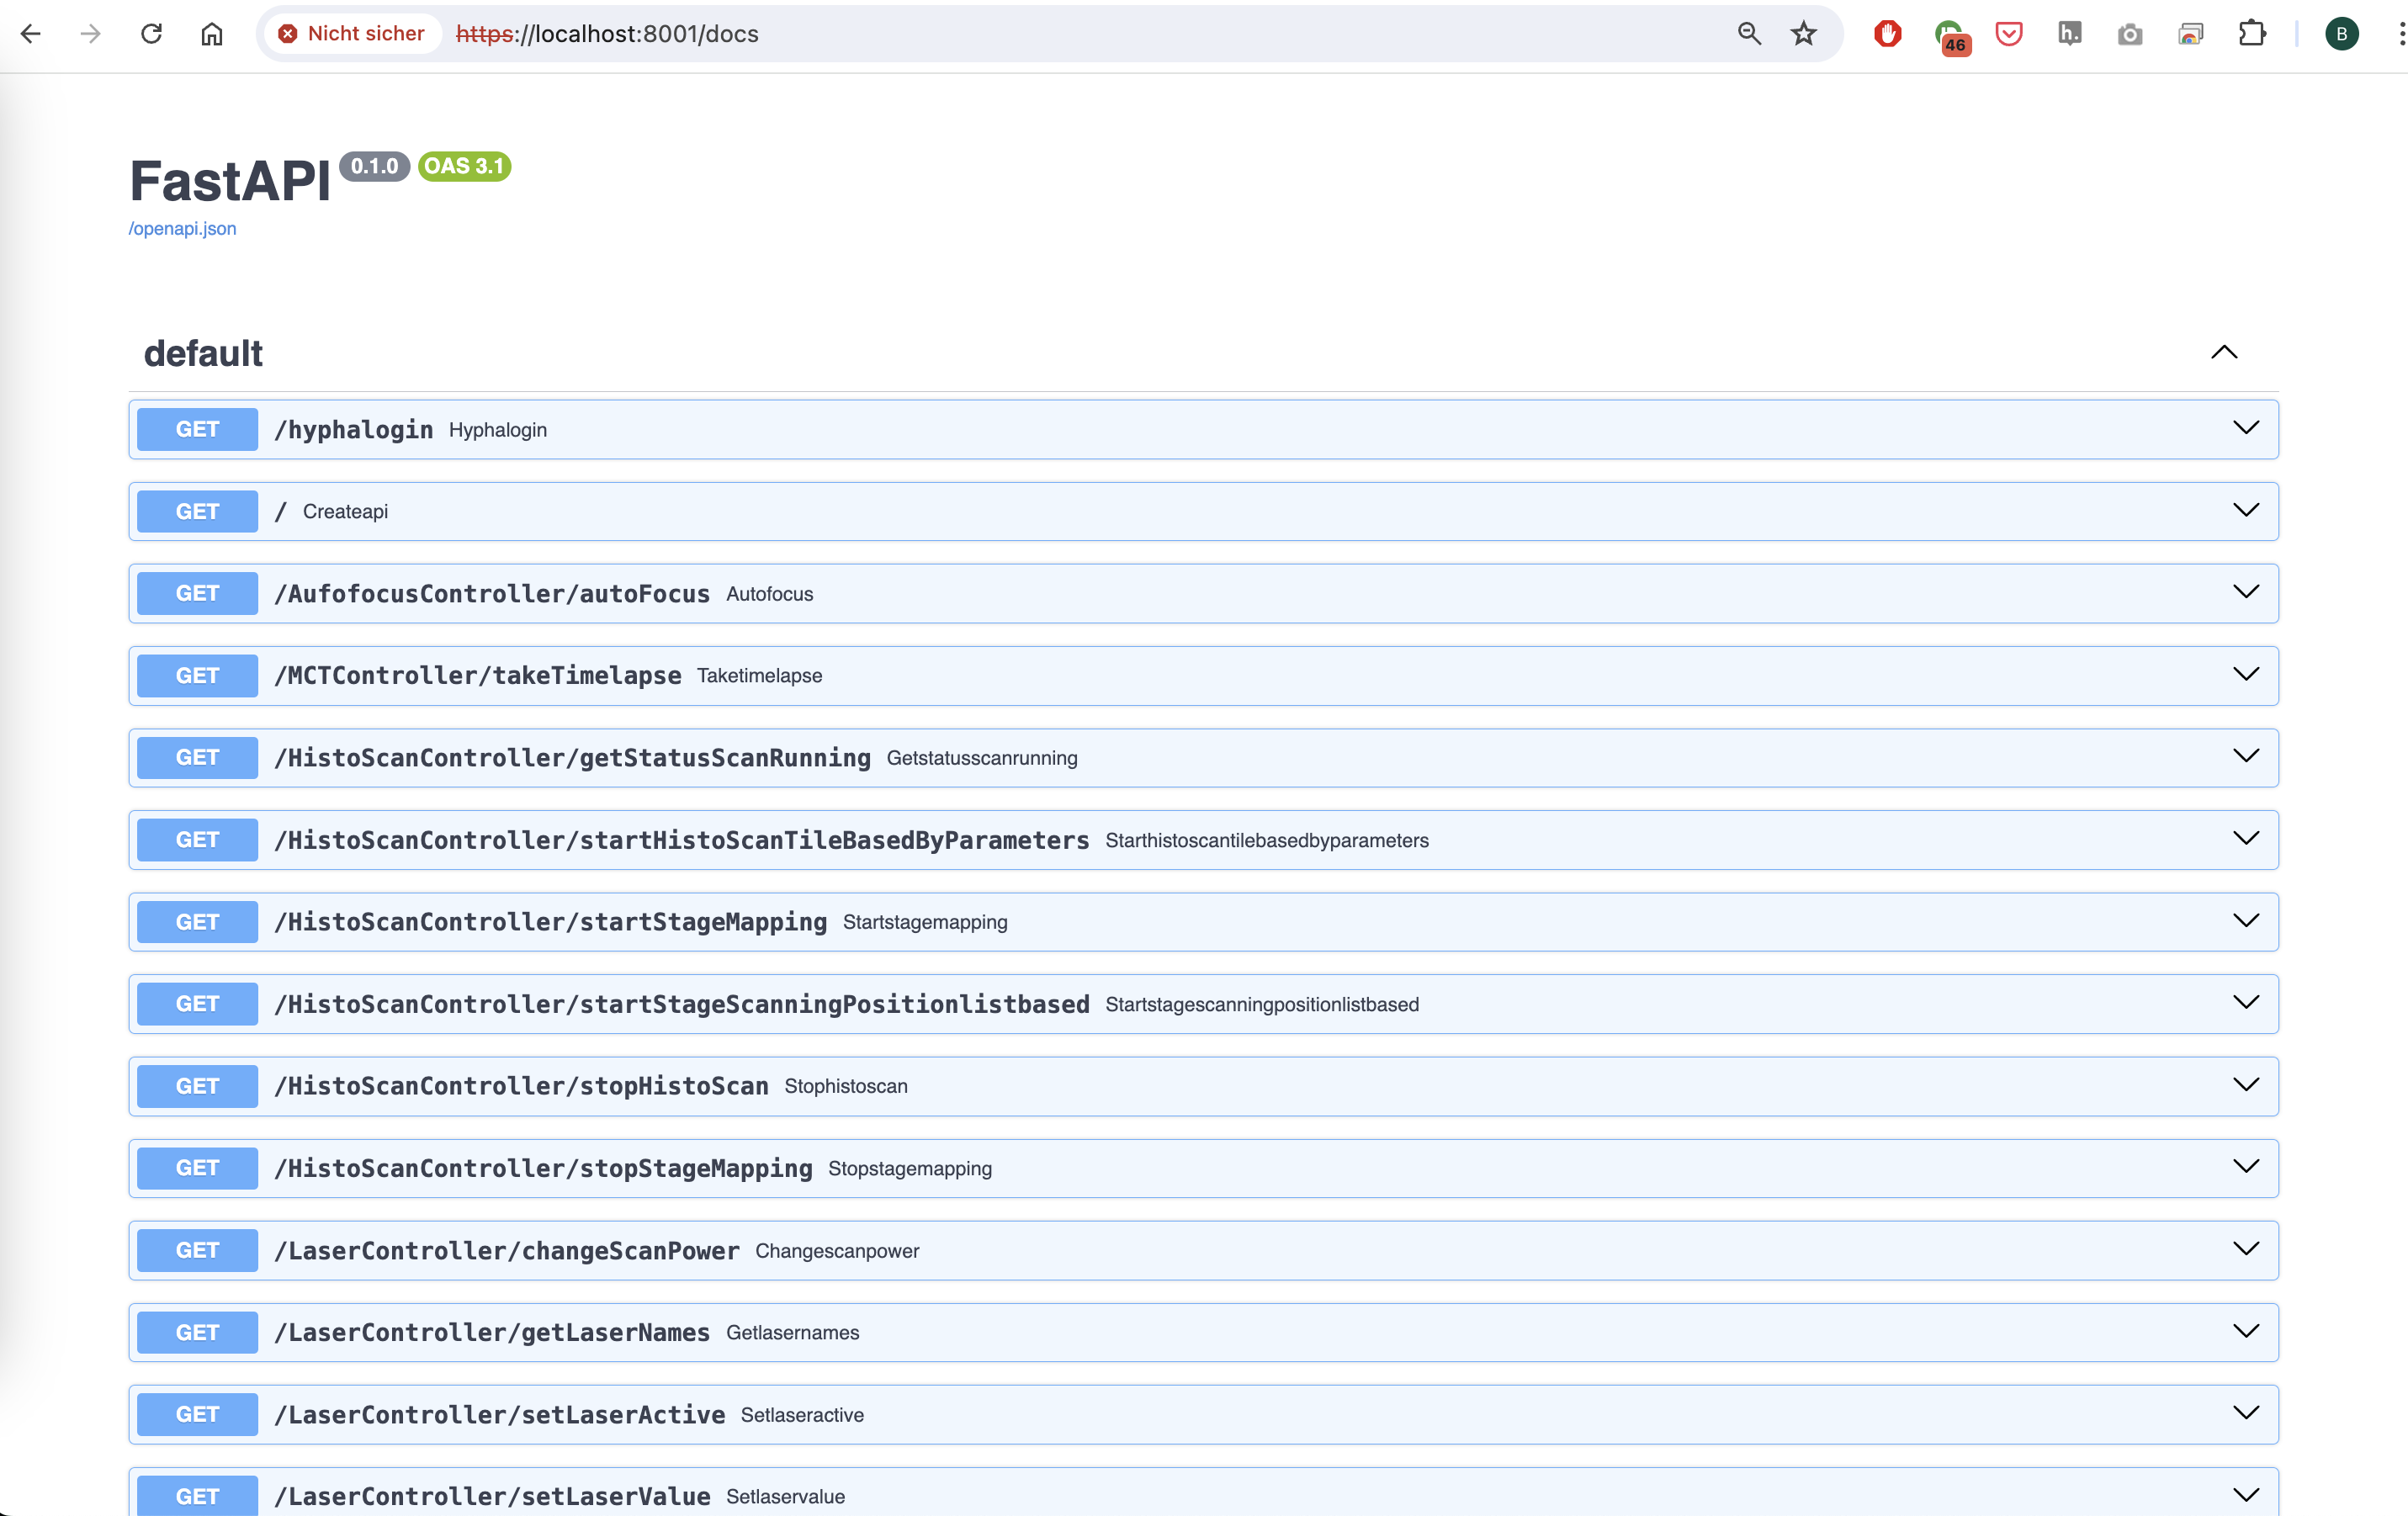 Swagger UI Interface of the ImSwitch Server
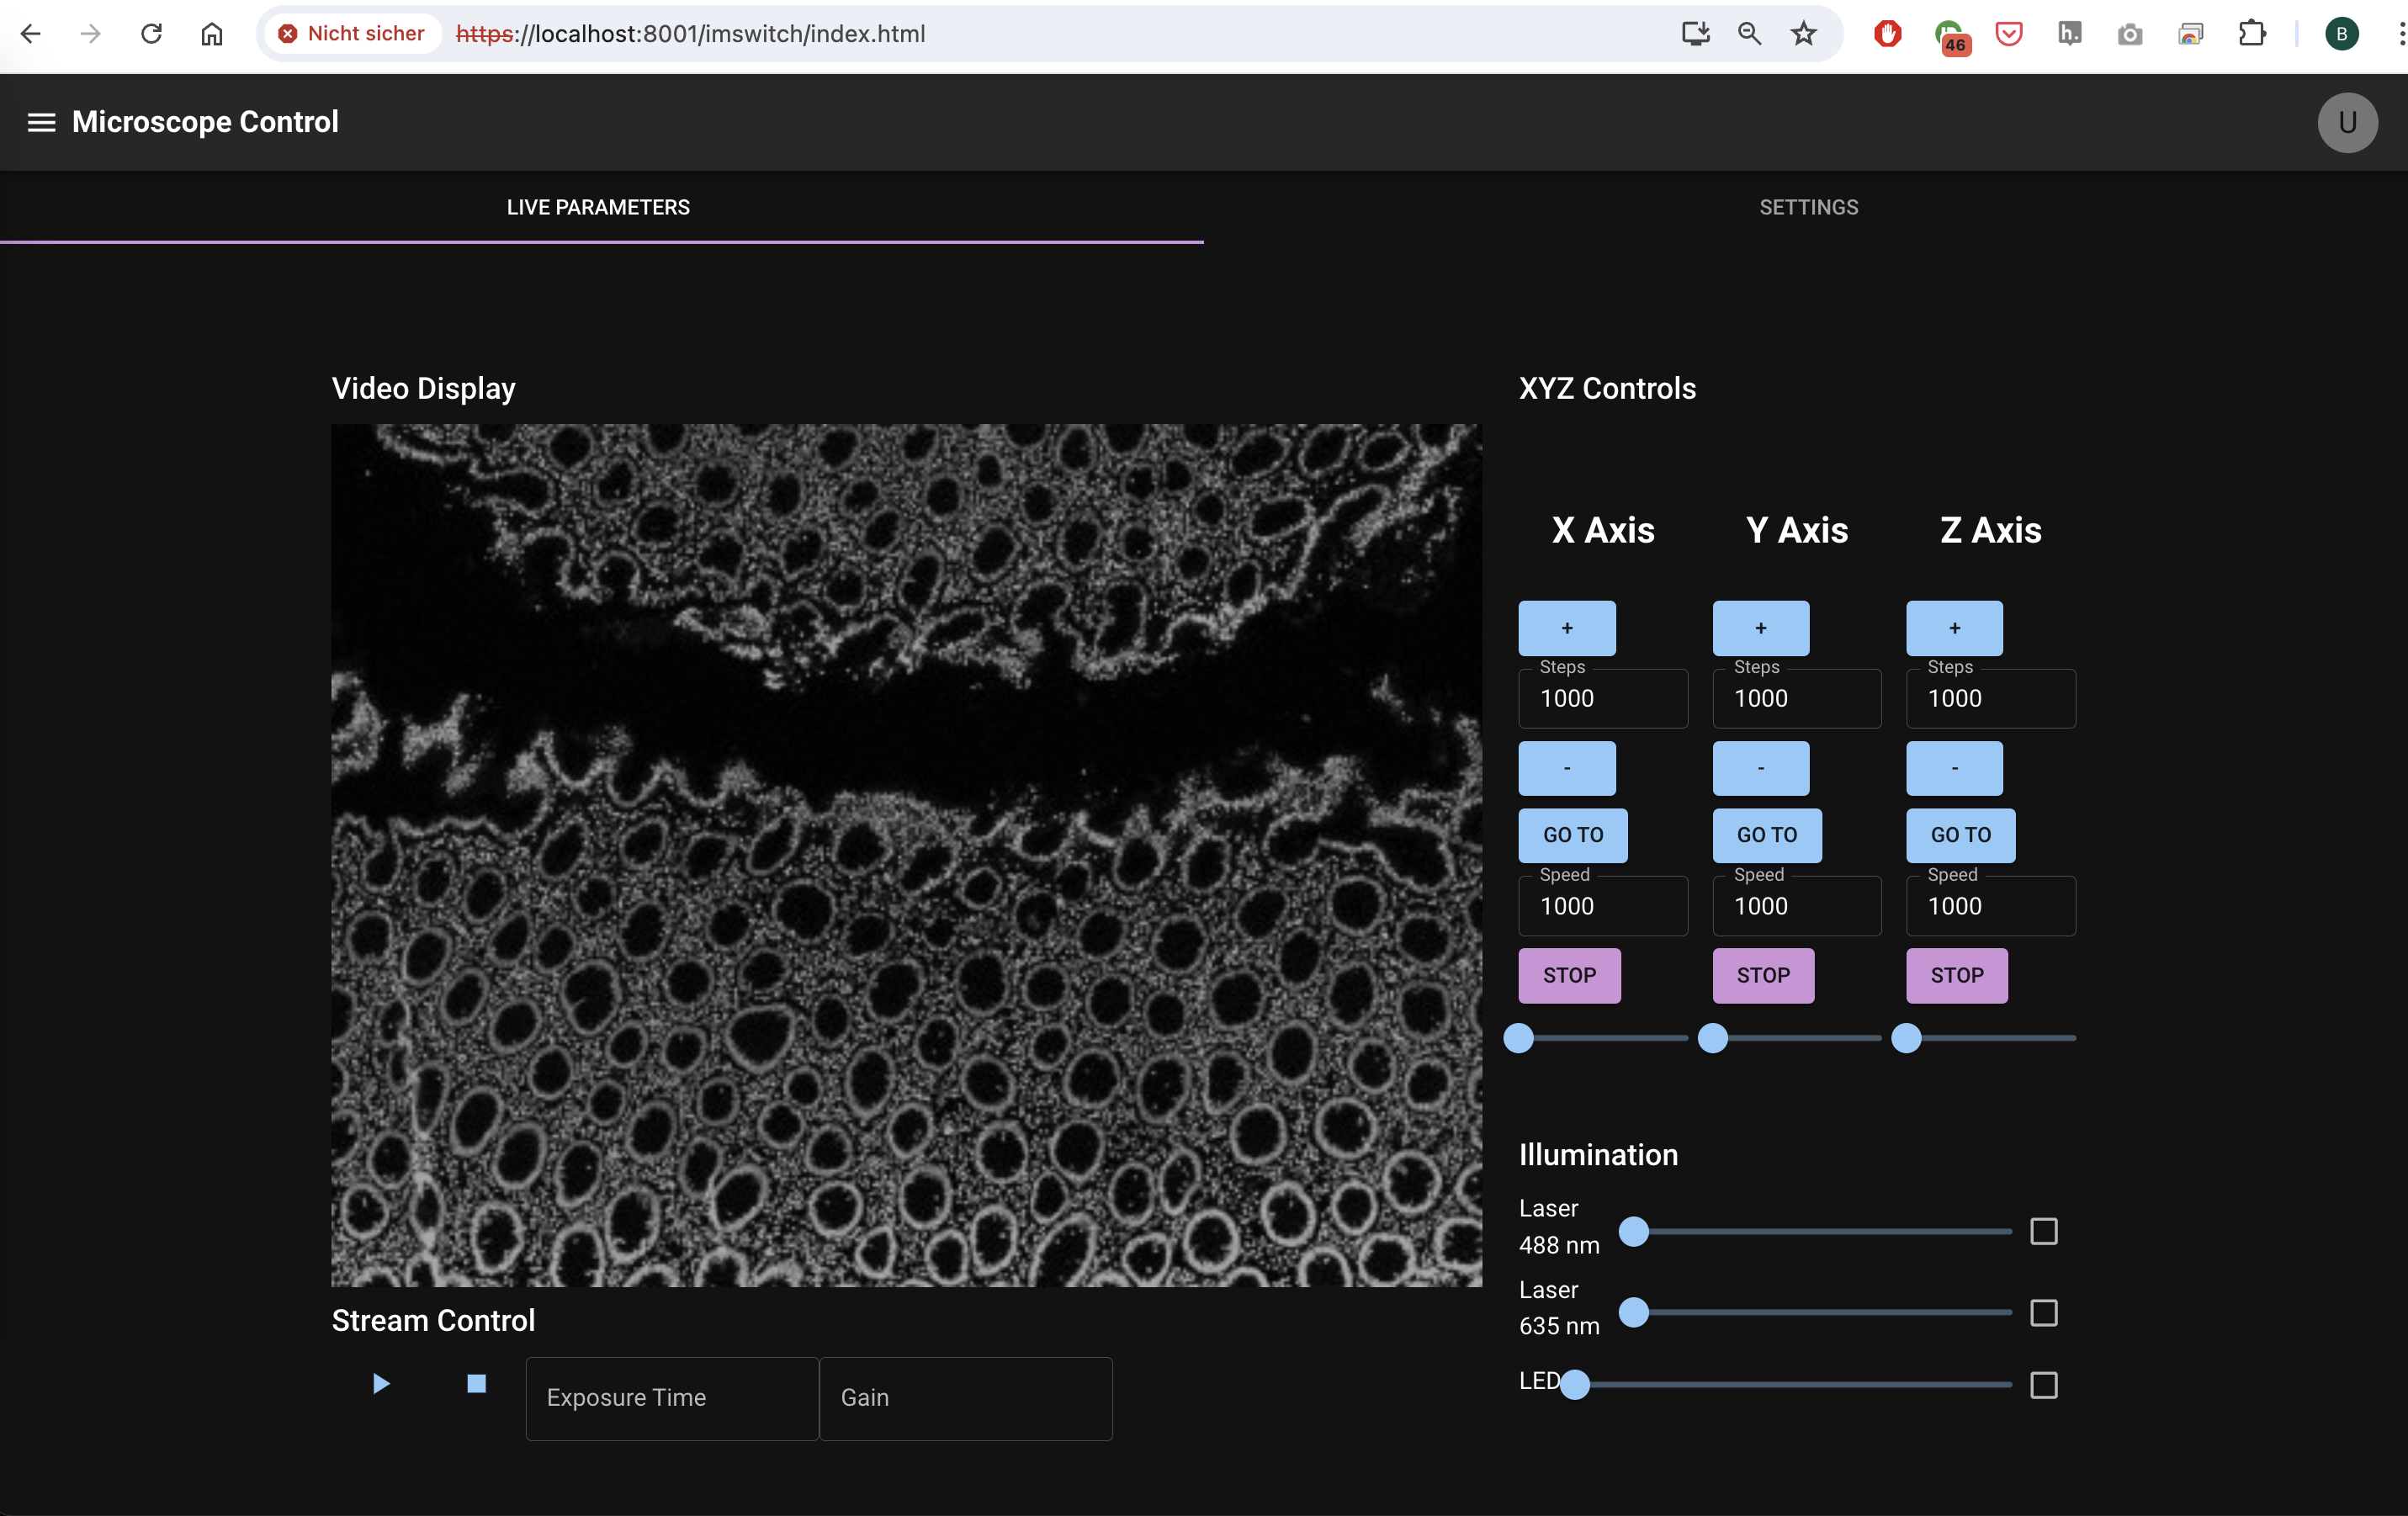 The React APP is statically hosted using a fastaAPI endpoint under https://localhost:8001/imswitch/index.html (ENSURE YOU HAVE ACCEPTED THE CERTIFICATE)
 *The images are build using CI using actions
 The docker Images are hosted on github containers
Prerequisites
- Docker installed on your system (Tested on Raspi, Jetson Nano, Mac M1, Windows)
- Optional: Docker Compose installed on your system
Docker Quick Start
ARM64 + X86
Pull the file from github containers:
sudo docker pull ghcr.io/openuc2/imswitch-noqt-x64:latest
Install the docker image and run it:
sudo docker run -it --rm -p 8001:8001 -p 2222:22 -e HEADLESS=1 -e HTTP_PORT=8001 -e CONFIG_FILE=example_uc2_hik_flowstop.json -e UPDATE_GIT=0 -e UPDATE_CONFIG=0 --privileged ghcr.io/openuc2/imswitch-noqt-x64:latest
Certainly! Here’s the updated section of the documentation with the changes incorporated:
Install the Docker Image and Run It
To install and run the ImSwitch Docker image, use the following command:
sudo docker run -it --rm -p 8001:8001 -p 2222:22 \
-e HEADLESS=1 \
-e HTTP_PORT=8001 \
-e CONFIG_FILE=example_uc2_hik_flowstop.json \
-e UPDATE_GIT=0 \
-e UPDATE_CONFIG=0 \
--privileged ghcr.io/openuc2/imswitch-noqt-x64:latest
List of Arguments
Here’s a breakdown of the arguments you can use to customize the ImSwitch Docker container:
HEADLESS=1                # ImSwitch will start without any GUI.
HTTP_PORT=8001            # Port to access e.g. the ImSwitch React GUI.
CONFIG_FILE=example_virtual_microscope.json # Default setup configuration.
UPDATE_GIT=true           # Pull the latest ImSwitch repository.
UPDATE_INSTALL_GIT=true   # Pull the latest ImSwitch repository and install all changes (e.g., new packages).
UPDATE_UC2=true           # Pull the latest UC2-REST repository.
UPDATE_INSTALL_UC2=true   # Pull the latest UC2-REST repository and install all changes.
UPDATE_CONFIG=true        # Pull the latest changes for setup configurations.
MODE=terminal             # Start Docker with bash for better debugging.
CONFIG_PATH=/Users/bene/Downloads # Path to the local ImSwitchConfig folder (uses the default inside the container if not specified).
DATA_PATH=/Users/bene/Downloads # Path to store data (e.g., USB drive; needs to be mounted via command line; uses the default inside the container if not specified).
PIP_PACKAGES (e.g. "arkitekt UC2-REST") # add new packages after container building
External folders for Config and Data
We can use external path (outside the container) to store and read data. This is helpful if we want to make changes e.g. to the config or want to store data/images. Remember, the docker container gets reseted after the next reboot!
We have two options.
- The Config folder. Let's have the following use case, where the folder should be linked to your Downloads folder. For this you ahve to specify two things in the way you call the docker image:
-e CONFIG_PATH=/config -v ~/Downloads:/config
This means that ImSwitch inside docker will use the folder /config/ImSwitchConfig/config to specify the setup configuration. The -v command will mount the host's Downloads folder as /config inside the docker container.
- The same mechanism can be used for specifying the datapath to specify the dataset storage. For this we have to specify:
-e DATA_PATH=/dataset -v ~/Downloads:/dataset
Images will be stored in that folder. Ensure the folder exists!
-v ~/Downloads:/config
Make changes persistent
This command configures and runs the ImSwitch Docker container with the following features:
Update the ImSwitch Repository and Make Changes Persistent:
- The
UPDATE_INSTALL_GIT=1environment variable triggers an update and reinstallation of the ImSwitch repository. - The ImSwitch repository changes are stored in the
/tmp/ImSwitch-changesdirectory within the container, which is mounted to~/Documents/imswitch_docker/imswitch_giton the host. This makes any updates or modifications persistent across container restarts.
- The
Persistent Storage of Installed Pip Packages:
- The
PIP_PACKAGESenvironment variable allows you to specify additional pip packages to install. In this example, "arkitekt" and "UC2-REST" are installed. - The installed pip packages are stored in the
/persistent_pip_packagesdirectory within the container, which is mounted to~/Documents/imswitch_docker/imswitch_pipon the host, ensuring persistence across container restarts.
- The
Using an External ImSwitchConfig Folder:
- The ImSwitch configuration files are stored in the
/root/ImSwitchConfigdirectory within the container, which is mounted to~/Downloadson the host. This allows you to easily manage and update your configuration files from your host machine.
- The ImSwitch configuration files are stored in the
Using an External Dataset Folder:
- The dataset files are stored in the
/datasetdirectory within the container, which is mounted to/media/uc2/SD2/on the host. This allows you to work with large datasets stored on your host machine.
- The dataset files are stored in the
Command Example:
sudo docker run -it --rm -p 8001:8001 -p 2222:22 \
-e UPDATE_INSTALL_GIT=1 \
-e PIP_PACKAGES="arkitekt UC2-REST" \
-e DATA_PATH=/dataset \
-e CONFIG_PATH=/config \
-v ~/Documents/imswitch_docker/imswitch_git:/tmp/ImSwitch-changes \
-v ~/Documents/imswitch_docker/imswitch_pip:/persistent_pip_packages \
-v /media/uc2/SD2/:/dataset \
-v ~/Downloads:/config \
imswitch_hik
Breakdown of the Command:
Port Mapping:
-p 8001:8001: Maps the container’s HTTP server port 8001 to the host’s port 8001.-p 2222:22: Maps the container’s SSH server port 22 to the host’s port 2222.
Environment Variables:
-e UPDATE_INSTALL_GIT=1: Updates and reinstalls the ImSwitch repository during container startup.-e PIP_PACKAGES="arkitekt UC2-REST": Installs additional pip packages (arkitekt,UC2-REST) and makes them persistent.
Volume Mounting:
-v ~/Documents/imswitch_docker/imswitch_git:/tmp/ImSwitch-changes: Mounts the host directory~/Documents/imswitch_docker/imswitch_gitto/tmp/ImSwitch-changesinside the container to persist changes to the ImSwitch repository.-v ~/Documents/imswitch_docker/imswitch_pip:/persistent_pip_packages: Mounts the host directory~/Documents/imswitch_docker/imswitch_pipto/persistent_pip_packagesinside the container for persistent pip package storage.-v /media/uc2/SD2/:/dataset: Mounts the host directory/media/uc2/SD2/to/datasetinside the container to use external datasets.-v ~/Downloads:/config: Mounts the host directory~/Downloadsto/configinside the container to use external configuration files.
This command is a comprehensive way to set up and run the ImSwitch Docker container, ensuring that updates, configurations, and additional installations are persistent and easily manageable.
Setting up docker on Raspi
#!/bin/bash

# Update package lists
sudo apt update -y

# Upgrade installed packages
sudo apt upgrade -y

# Install Docker
curl -sSL https://get.docker.com | sh

# Add current user to the Docker group
sudo usermod -aG docker $USER

# Print message to logout and login again
echo "Please log out and log back in to apply the Docker group changes."

# Verify group membership (this will not reflect the changes until you log out and log back in)
groups
To save this script, you can copy the content above into a file, for example, install_docker.sh, and then run the script using the following command:
chmod +x install_docker.sh
./install_docker.sh
After running the script, you will need to log out and log back in to apply the Docker group changes. Once you log back in, you can verify your membership in the Docker group by running:
groups
Additional Information
This tutorial will guide you through the process of setting up the ImSwitch React frontend and backend using Docker Compose. The ImSwitch React frontend is exposed on port 3000 and provides access to the REST API via a Swagger UI running in another Docker container on localhost:8001. The Swagger UI is available at localhost:8001/docs. This setup uses a simulated microscope with a line-like sample. The configuration is provided by a JSON file that can be updated if the corresponding flag is set. Additionally, the ImSwitch version can be updated based on a flag. If access to the camera (HIK camera and UC2-REST) is needed, the --privileged flag must be set.
Docker Compose Configuration
Create a docker-compose.yml file with the following content or use the file in compose.yaml:
version: '3.8'

services:
  imswitch-aiortc-react:
    image: ghcr.io/openuc2/imswitch-aiortc-react:latest
    ports:
      - "5000:5000"
      - "8002:8001"
    environment:
      - NODE_ENV=production
    stdin_open: true
    tty: true

  imswitch-docker-arm64-noqt:
    image: ghcr.io/openuc2/imswitch-docker-arm64-noqt:latest
    privileged: true
    ports:
      - "8001:8001"
      - "2222:22"
    environment:
      - HEADLESS=1
      - HTTP_PORT=8001
      - CONFIG_FILE=example_virtual_microscope.json
      - UPDATE_GIT=1
      - UPDATE_CONFIG=0
    stdin_open: true
    tty: true
    restart: always
Explanation
imswitch-aiortc-react: This service runs the ImSwitch React frontend.
- image: Specifies the Docker image to use.
- ports: Maps the container ports to the host ports.
- environment: Sets environment variables inside the container.
- stdin_open and tty: Keeps the container running in interactive mode.
imswitch-docker-arm64-noqt: This service runs the backend with the Swagger UI.
- image: Specifies the Docker image to use.
- privileged: Grants the container privileged access to the hardware.
- ports: Maps the container ports to the host ports.
- environment: Sets environment variables inside the container.
- stdin_open and tty: Keeps the container running in interactive mode.
- restart: Ensures the container restarts automatically if it stops.
Running Docker Compose
- Save the
docker-compose.ymlfile to a directory on your machine. - Open a terminal and navigate to the directory containing the
docker-compose.ymlfile. - Start the services with Docker Compose:
docker-compose -f docker-compose.yml up -d
- go to your browser and access the microscope server under https://localhost:8001/docs to access the swagger uI
- go to your browser and access the microscope control UI under http://localhost:3000
5.1 enter the IP address and port und
Connections:https://localhostand8001as port
Accessing the Services individually
- ImSwitch React Frontend: Open your browser and navigate to
http://localhost:3000to access the ImSwitch React frontend. - Swagger UI: Navigate to
http://localhost:8001/docsto access the Swagger UI for the backend API.
Configuration Details
- Simulated Microscope: The current configuration uses a simulated microscope offering a line-like sample. The configuration is provided by a JSON file specified in the
CONFIG_FILEenvironment variable. - Updating Configuration and Version: The JSON configuration and the ImSwitch version can be updated if the
UPDATE_CONFIGandUPDATE_GITflags are set, respectively. - Camera Access: If access to the camera (HIK camera and UC2-REST) is needed, the
--privilegedflag must be set.
Stopping the Services
To stop the services, run the following command:
docker-compose -f docker-compose.yml down
This command stops and removes all containers defined in the docker-compose.yml file.
Additional Notes
- Ensure that Docker and Docker Compose are installed and running on your system.
- The
--privilegedflag is necessary for accessing certain hardware components like cameras.
By following this tutorial, you should be able to set up and run the ImSwitch React frontend and backend with Docker Compose, providing a seamless environment for interacting with the simulated microscope and accessing the API via Swagger UI.
To make the CONFIG_PATH available as a folder outside the container on the host computer (e.g., in ~/Downloads/ImSwitchConfig), you can use Docker's volume mounting feature. This allows you to mount a directory from the host machine into the container, making it accessible from within the container.
Here's how you can modify your Docker run command to mount the ~/Downloads/ImSwitchConfig directory from the host to the container:
- Modify the Docker run command: Use the
-v(or--volume) option to mount the directory.
sudo docker run -it --rm -p 8001:8001 -p 2222:22 \
    -e HEADLESS=1 \
    -e HTTP_PORT=8001 \
    -e CONFIG_FILE=example_virtual_microscope.json \
    -e UPDATE_GIT=0 \
    -e UPDATE_CONFIG=0 \
    -e CONFIG_PATH=/config \
    --privileged \
    -v ~/Downloads/ImSwitchConfig:/config \
    imswitch_hik
- Update the CMD in your Dockerfile to use the
CONFIG_PATHenvironment variable:
CMD ["/bin/bash", "-c", "\
    if [ \"$MODE\" = \"terminal\" ]; then \
        /bin/bash; \
    else \
        echo 'LSUSB' && lsusb && \
        /usr/sbin/sshd -D & \
        ls /root/ImSwitchConfig && \
        if [ \"$UPDATE_GIT\" = \"true\" ]; then \
            cd /tmp/ImSwitch && \
            git pull; \
        fi && \
        if [ \"$UPDATE_INSTALL_GIT\" = \"true\" ]; then \
            cd /tmp/ImSwitch && \
            git pull && \
            /bin/bash -c 'source /opt/conda/bin/activate imswitch && pip install -e /tmp/ImSwitch'; \
        fi && \
        if [ \"$UPDATE_UC2\" = \"true\" ]; then \
            cd /tmp/UC2-REST && \
            git pull; \
        fi && \
        if [ \"$UPDATE_INSTALL_UC2\" = \"true\" ]; then \
            cd /tmp/UC2-REST && \
            git pull && \
            /bin/bash -c 'source /opt/conda/bin/activate imswitch && pip install -e /tmp/UC2-ESP'; \
        fi && \
        if [ \"$UPDATE_CONFIG\" = \"true\" ]; then \
            cd /root/ImSwitchConfig && \
            git pull; \
        fi && \
        source /opt/conda/bin/activate imswitch && \
        HEADLESS=${HEADLESS:-1} && \
        HTTP_PORT=${HTTP_PORT:-8001} && \
        CONFIG_FILE=${CONFIG_FILE:-/root/ImSwitchConfig/imcontrol_setup/example_virtual_microscope.json} && \
        USB_DEVICE_PATH=${USB_DEVICE_PATH:-/dev/bus/usb} && \
        CONFIG_PATH=${CONFIG_PATH:-None} && \
        echo \"python3 /tmp/ImSwitch/main.py --headless $HEADLESS --config-file $CONFIG_FILE --http-port $HTTP_PORT \" && \
        python3 /tmp/ImSwitch/main.py --headless $HEADLESS --config-file $CONFIG_FILE --http-port $HTTP_PORT --config-folder $CONFIG_PATH; \
    fi"]
By adding the -v ~/Downloads/ImSwitchConfig:/config option in the docker run command, you mount the host's ~/Downloads/ImSwitchConfig directory to the /config directory inside the container. The -e CONFIG_PATH=/config environment variable makes sure that the container uses this mounted directory as the configuration path.
Now, any changes you make in ~/Downloads/ImSwitchConfig on your host machine will be reflected inside the container at /config, and the application running inside the container will use this directory for its configuration files.
Certainly! Here's a summary and explanation of the combined script:
Autostarting ImSwitch on e.g. the Raspberry Pi
The script setup_autostart.sh performs the following actions:
Creates a startup script (
start_imswitch.sh) that:- Waits for the X server to be available.
- Starts the Docker container in the background.
- Launches Chromium in fullscreen mode, opening a specific URL and zooming out the page to 70%.
- Logs output to a file for debugging purposes.
Creates a systemd service (
start_imswitch.service) that:- Ensures the startup script runs only after the X server is available.
- Restarts the script on failure.
- Configures logging to the systemd journal.
Explanation
#!/bin/bash

# Define variables
START_SCRIPT_PATH="$HOME/start_imswitch.sh"
SERVICE_FILE_PATH="/etc/systemd/system/start_imswitch.service"

# Create the startup script
cat << 'EOF' > $START_SCRIPT_PATH
#!/bin/bash
set -x

LOGFILE=/home/uc2/start_imswitch.log
exec > $LOGFILE 2>&1

echo "Starting IMSwitch Docker container and Chromium"

# Wait for the X server to be available
while ! xset q &>/dev/null; do
  echo "Waiting for X server..."
  sleep 2
done

export DISPLAY=:0

# Start Docker container in the background
echo "Running Docker container..."
nohup sudo docker run --rm -d -p 8001:8001 -p 2222:22 \
  -e HEADLESS=1 -e HTTP_PORT=8001 \
  -e CONFIG_FILE=example_uc2_hik_flowstop.json \
  -e UPDATE_GIT=1 -e UPDATE_CONFIG=0 \
  --privileged ghcr.io/openuc2/imswitch-noqt-x64:latest &

# Wait a bit to ensure Docker starts
sleep 10

# Start Chromium
echo "Starting Chromium..."
/usr/bin/chromium-browser --start-fullscreen --ignore-certificate-errors \
  --unsafely-treat-insecure-origin-as-secure=https://0.0.0.0:8001 \
  --app="data:text/html,<html><body><script>window.location.href='https://0.0.0.0:8001/imswitch/index.html';setTimeout(function(){document.body.style.zoom='0.7';}, 3000);</script></body></html>"

echo "Startup script completed"
EOF

# Make the startup script executable
chmod +x $START_SCRIPT_PATH

echo "Startup script created at $START_SCRIPT_PATH and made executable."

# Create the systemd service file
sudo bash -c "cat << EOF > $SERVICE_FILE_PATH
[Unit]
Description=Start IMSwitch Docker and Chromium
After=display-manager.service
Requires=display-manager.service

[Service]
Type=simple
ExecStart=$START_SCRIPT_PATH
User=$USER
Environment=DISPLAY=:0
Restart=on-failure
TimeoutSec=300
StandardOutput=journal
StandardError=journal

[Install]
WantedBy=graphical.target
EOF"

# Reload systemd, enable and start the new service
sudo systemctl daemon-reload
sudo systemctl enable start_imswitch.service
sudo systemctl start start_imswitch.service

echo "Systemd service created and enabled to start at boot."
Detailed Steps:
Define Paths:
START_SCRIPT_PATHandSERVICE_FILE_PATHare set to the paths where the startup script and the systemd service file will be created.
Create the Startup Script:
- Logging: Redirects output to a log file (
/home/uc2/start_imswitch.log). - Wait for X Server: Uses a loop to check if the X server is available (
xset q). - Start Docker: Runs the Docker container in detached mode (
-d), ensuring it runs in the background without expecting a TTY. - Start Chromium: Opens Chromium in fullscreen mode, bypassing certificate errors, and zooms the page to 70%.
- Logging: Redirects output to a log file (
Make the Script Executable:
- Sets the
start_imswitch.shscript as executable usingchmod +x.
- Sets the
Create the Systemd Service File:
- Dependencies: Ensures the service runs after the display manager service (
display-manager.service), which starts the X server. - Service Configuration: Specifies the script to run (
ExecStart), user to run it as (User), environment variables (Environment), and restart behavior on failure (Restart=on-failure). - Logging: Configures logging to the systemd journal (
StandardOutputandStandardError).
- Dependencies: Ensures the service runs after the display manager service (
Enable and Start the Service:
- Reloads systemd to recognize the new service.
- Enables the service to start at boot.
- Starts the service immediately.
By running the combined script, you ensure that the IMSwitch Docker container and Chromium browser will start automatically after the X server is available, with proper logging and background execution.